


RaWarrior
Well-Known Member
I've never been a big fan of the "dummy" gauges that don't have any numbers on them. For whatever reason, they kind of annoy me. If you're going to bother with an actual gauge instead of an idiot light, might as well do it right and calibrate it rather than just slapping a "hot" and "cold" line at either end. So for a little project I figured I'd replace it with a real one so I can stop saying "yeah, it tends to run between a third and halfway up the scale".
Anyway, this is the gauge I bought. Came to about $80 shipped. You can find ones a lot cheaper, and a lot more expensive. This SAGA gauge was recommended by another member, and it's got a full sweep display and stepper motor drive (so the needle won't vibrate on something like a bike). It also has a rather cool opening "sweep" when you turn the key on, and I'm kind of a gadget whore. It also saves and replays the peak temperature when you shut the key off, and can be set to flash the pointer and/or beep at a set warning temperature. By default it's 212, but you can set it to whatever you want.
To install it you will need:
4mm hex
12mm wrench
1/8" NPT pipe tap (aka 1/8-27)
Teflon pipe tape (plumbers tape)
Three blue quick splice connectors, and three reds
Electrical tape/liquid tape
This SAGA gauge came with a flexible metal mounting plate/ring clamp with those industrial double sided adhesive pads. This happened to fit perfectly on the handlebar clamp, hanging the gauge slightly underneath it. If you use a different gauge or yours doesn't come with mounting hardware, you may need to buy one or get creative with the stock cluster. The stock temp and tach are one piece split by two windows so you can't easily replace only one. The temp window is also a bit smaller than the tach's, and I could not find a full sweep gauge in anything smaller than 2" (52mm).
Start by removing the airbox lid, the seat, and the right side scoop. After the scoop is removed, pull off the plastic cover that goes over the coolant manifold/cap. You'll see something like this:
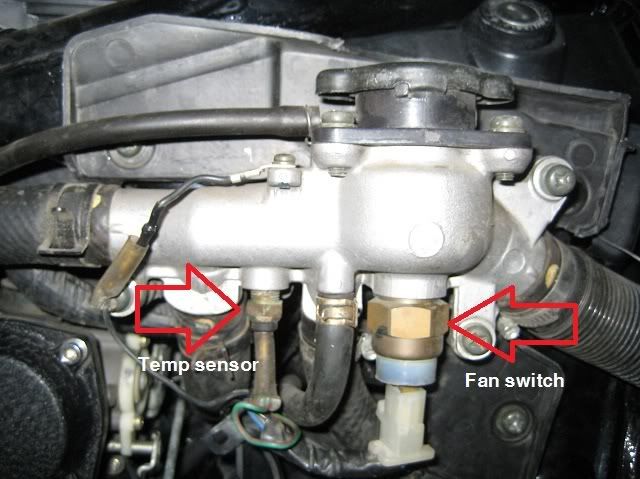
The fan and gauge have two different sensors, so installing a different gauge will not affect the automatic fan, it will still kick on by itself at around 195 degrees according to the service manual.
Put the bike on the side stand, it makes this a bit easier. Then remove the cap and with a small piece of hose, siphon out the coolant sitting in the manifold to minimize spilling when you remove the sensor. Once you've got most of it out, pull the wire off the temp sensor (it's just a bullet connector), and get out your 12mm wrench. If possible use a six sided since it's brass and easy to round off, I almost rounded mine using a box end 12mm, it was in there pretty good.
Once it's loose, get a rag stuffed underneath it, since it'll probably still dribble some out. Remove the old sensor. Get your gauge's new sensor, if it's an electronic gauge(wires instead of a capillary tube), chances are it has a 1/8 NPT sensor, it seems to be pretty standard. If you try to put it in the existing hole, it'll only go in about 1.5 turns....the threads don't quite match. Grab the pipe tap and get it started by hand. Since there wasn't any room to get the tap handle in there, I used a pair of channellocks to grab the square end of the tap and twist it in. My pipe tap was tapered, so the farther in the tougher it got to turn. After a reasonable amount, say 4 or 5 turns, take it out. Since you're cutting from the bottom, most of the chips fell out the flutes, or stuck in the flutes. I wasn't too worried about chips getting into the manifold itself since I don't think the tap made it all the way through the threads anyway. I used a q-tip to swab out the new threads and remove as many chips as possible.
The new sensor looks much like the old, except mine has a short pigtail and harness connector molded into it. Put some tape on the threads and mine went in easy as could be. I tightened mine "by feel", just what I thought was tight enough for it. I wouldn't go crazy tightening it in fear of cracking the manifold.
Now...onto the wiring. My gauge had two harness wires...one connected to the sensor's plug, the other ended in five (very) small wires...red, black, orange, yellow, and brown. The manual is less than clear about which goes where(lousy Chinese translation), I figured out what works by trial and error. Red and orange should have +12v power at all times. Yellow is keyed power. Black is ground, brown doesn't seem to do anything so I left it unconnected.
Here's my wiring job. Not the most professional look ever, but it's hidden under the seat so who cares.
Your underseat area will probably look a little different since I'm running COPs (no coils), and a MOSFET style r/r off a ZX10 (which went in the coils place). As such, the old factory connectors for the r/r were just chilling out in there. I used the red one as a convenient constant +12v source. Since the gauge's wires are so small, I had to "step down" the splice, first with a blue splice connector to a short bit of 16ga wire, then a red connector to the gauge's wire. I still stripped and doubled over the incredibly tiny gauge wire to ensure the connector got a good "bite", which it did. I left the yellow open for the picture so you can see what I mean. For the keyed power, the manual asks the yellow to "not interrupt upon starting of engine", and my trial and error showed the yellow is what actually tuns the gauge on and off. I picked the tail light power for that, since the headlight dies when you crank it. A quick look at the wiring diagram shows the blue wire in the harness is the constant tailight power(not brake). Carefully cut away the factory tape and dig out the blue wire, then do the double splice to the gauge's yellow. Find somewhere to ground the black one (I used the former coil mounting plate's bolt), and then tidy up the wires.
The gauge came with a really long wire for the sensor, I ended up coiling about 75% of it up and stuffing it next to the coolant puke tank to get it out of the way before running it up along side the airbox and "out" through the plastic cover that also holds the ignition. I did the same for the power harness on the other side, so all you see are two clean black wires coming up to the gauge.
Pictures are better than words here, this is how I mounted it:
The little black strip (there's one underneath too) has the adhesive pad on the back. Since it's chilly in my garage they didn't want to stick, but a quick shot with the heat gun and they grabbed on good....it's VERY firmly mounted and holds the gauge in the perfect spot. Just the right angle to look at from a riding position, and since it's in the center of the bars you don't need loads of slack in the wire to accommodate turning lock to lock.
Here's what it looks like lit up. The red perfectly matches the red LEDs I put in the other gauges as well. In the picture it looks more orange, but in person it's pretty darn close.
Pressing the right button shows the current warning temp setting. Holding it allows you to set it by pressing the up or down buttons. When you turn the key off, the needle moves to the peak temp and flashes blue a couple times, then sweeps and goes dark.
Anyway, this is the gauge I bought. Came to about $80 shipped. You can find ones a lot cheaper, and a lot more expensive. This SAGA gauge was recommended by another member, and it's got a full sweep display and stepper motor drive (so the needle won't vibrate on something like a bike). It also has a rather cool opening "sweep" when you turn the key on, and I'm kind of a gadget whore. It also saves and replays the peak temperature when you shut the key off, and can be set to flash the pointer and/or beep at a set warning temperature. By default it's 212, but you can set it to whatever you want.
To install it you will need:
4mm hex
12mm wrench
1/8" NPT pipe tap (aka 1/8-27)
Teflon pipe tape (plumbers tape)
Three blue quick splice connectors, and three reds
Electrical tape/liquid tape
This SAGA gauge came with a flexible metal mounting plate/ring clamp with those industrial double sided adhesive pads. This happened to fit perfectly on the handlebar clamp, hanging the gauge slightly underneath it. If you use a different gauge or yours doesn't come with mounting hardware, you may need to buy one or get creative with the stock cluster. The stock temp and tach are one piece split by two windows so you can't easily replace only one. The temp window is also a bit smaller than the tach's, and I could not find a full sweep gauge in anything smaller than 2" (52mm).
Start by removing the airbox lid, the seat, and the right side scoop. After the scoop is removed, pull off the plastic cover that goes over the coolant manifold/cap. You'll see something like this:
The fan and gauge have two different sensors, so installing a different gauge will not affect the automatic fan, it will still kick on by itself at around 195 degrees according to the service manual.
Put the bike on the side stand, it makes this a bit easier. Then remove the cap and with a small piece of hose, siphon out the coolant sitting in the manifold to minimize spilling when you remove the sensor. Once you've got most of it out, pull the wire off the temp sensor (it's just a bullet connector), and get out your 12mm wrench. If possible use a six sided since it's brass and easy to round off, I almost rounded mine using a box end 12mm, it was in there pretty good.
Once it's loose, get a rag stuffed underneath it, since it'll probably still dribble some out. Remove the old sensor. Get your gauge's new sensor, if it's an electronic gauge(wires instead of a capillary tube), chances are it has a 1/8 NPT sensor, it seems to be pretty standard. If you try to put it in the existing hole, it'll only go in about 1.5 turns....the threads don't quite match. Grab the pipe tap and get it started by hand. Since there wasn't any room to get the tap handle in there, I used a pair of channellocks to grab the square end of the tap and twist it in. My pipe tap was tapered, so the farther in the tougher it got to turn. After a reasonable amount, say 4 or 5 turns, take it out. Since you're cutting from the bottom, most of the chips fell out the flutes, or stuck in the flutes. I wasn't too worried about chips getting into the manifold itself since I don't think the tap made it all the way through the threads anyway. I used a q-tip to swab out the new threads and remove as many chips as possible.
The new sensor looks much like the old, except mine has a short pigtail and harness connector molded into it. Put some tape on the threads and mine went in easy as could be. I tightened mine "by feel", just what I thought was tight enough for it. I wouldn't go crazy tightening it in fear of cracking the manifold.
Now...onto the wiring. My gauge had two harness wires...one connected to the sensor's plug, the other ended in five (very) small wires...red, black, orange, yellow, and brown. The manual is less than clear about which goes where(lousy Chinese translation), I figured out what works by trial and error. Red and orange should have +12v power at all times. Yellow is keyed power. Black is ground, brown doesn't seem to do anything so I left it unconnected.
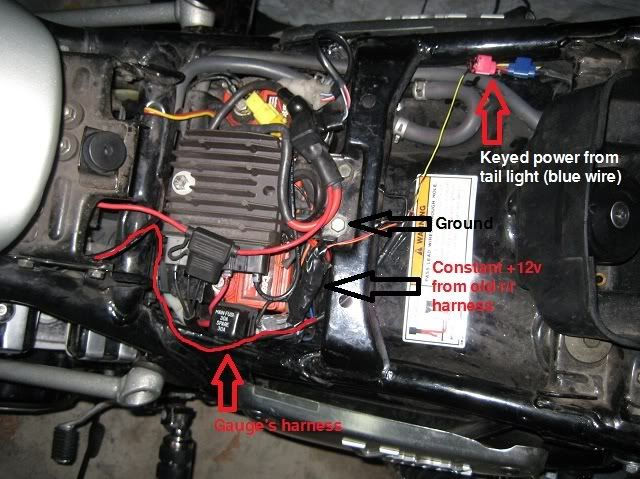
Here's my wiring job. Not the most professional look ever, but it's hidden under the seat so who cares.
Your underseat area will probably look a little different since I'm running COPs (no coils), and a MOSFET style r/r off a ZX10 (which went in the coils place). As such, the old factory connectors for the r/r were just chilling out in there. I used the red one as a convenient constant +12v source. Since the gauge's wires are so small, I had to "step down" the splice, first with a blue splice connector to a short bit of 16ga wire, then a red connector to the gauge's wire. I still stripped and doubled over the incredibly tiny gauge wire to ensure the connector got a good "bite", which it did. I left the yellow open for the picture so you can see what I mean. For the keyed power, the manual asks the yellow to "not interrupt upon starting of engine", and my trial and error showed the yellow is what actually tuns the gauge on and off. I picked the tail light power for that, since the headlight dies when you crank it. A quick look at the wiring diagram shows the blue wire in the harness is the constant tailight power(not brake). Carefully cut away the factory tape and dig out the blue wire, then do the double splice to the gauge's yellow. Find somewhere to ground the black one (I used the former coil mounting plate's bolt), and then tidy up the wires.
The gauge came with a really long wire for the sensor, I ended up coiling about 75% of it up and stuffing it next to the coolant puke tank to get it out of the way before running it up along side the airbox and "out" through the plastic cover that also holds the ignition. I did the same for the power harness on the other side, so all you see are two clean black wires coming up to the gauge.
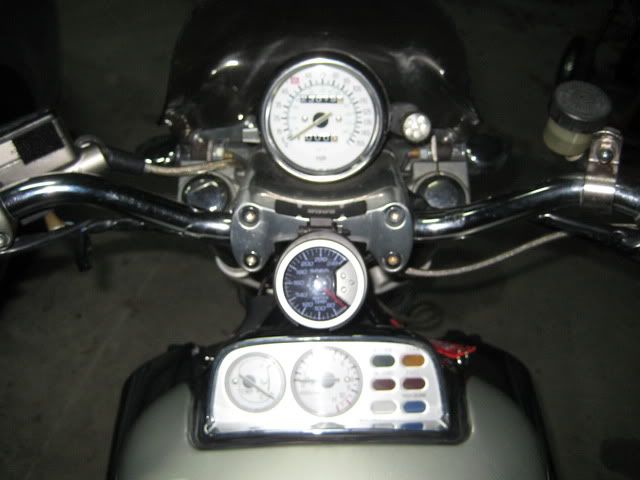
Pictures are better than words here, this is how I mounted it:
The little black strip (there's one underneath too) has the adhesive pad on the back. Since it's chilly in my garage they didn't want to stick, but a quick shot with the heat gun and they grabbed on good....it's VERY firmly mounted and holds the gauge in the perfect spot. Just the right angle to look at from a riding position, and since it's in the center of the bars you don't need loads of slack in the wire to accommodate turning lock to lock.
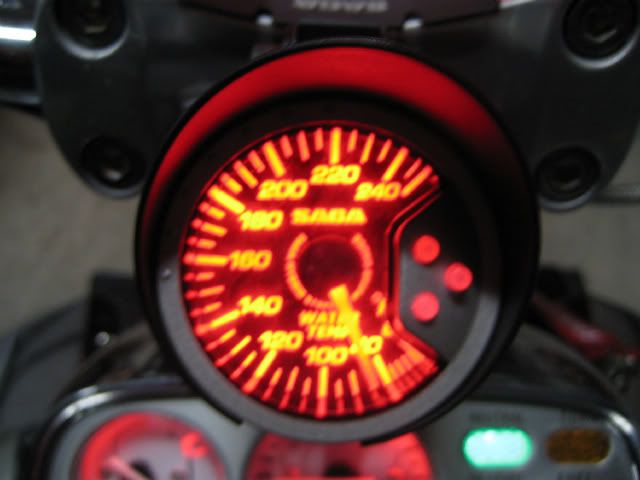
Here's what it looks like lit up. The red perfectly matches the red LEDs I put in the other gauges as well. In the picture it looks more orange, but in person it's pretty darn close.
Pressing the right button shows the current warning temp setting. Holding it allows you to set it by pressing the up or down buttons. When you turn the key off, the needle moves to the peak temp and flashes blue a couple times, then sweeps and goes dark.
Last edited:
")