Measured valve clearances

VMAX  Forum

Help Support VMAX Forum:

This site may earn a commission from merchant affiliate links, including eBay, Amazon, and others.

Zenuwlijer

Well-Known Member
Joined
Aug 14, 2017
Messages
168
Reaction score
70
Location
Netherlands
Hi folks,

It's winter, so I've got the time to learn stuff. Grabbed the Haynes manual in combination with the howto from @naughtyG and got started.

I've measured the valve clearances and most of them are off spec. Some are too loose, some are too tight.

f6okIPH.jpg

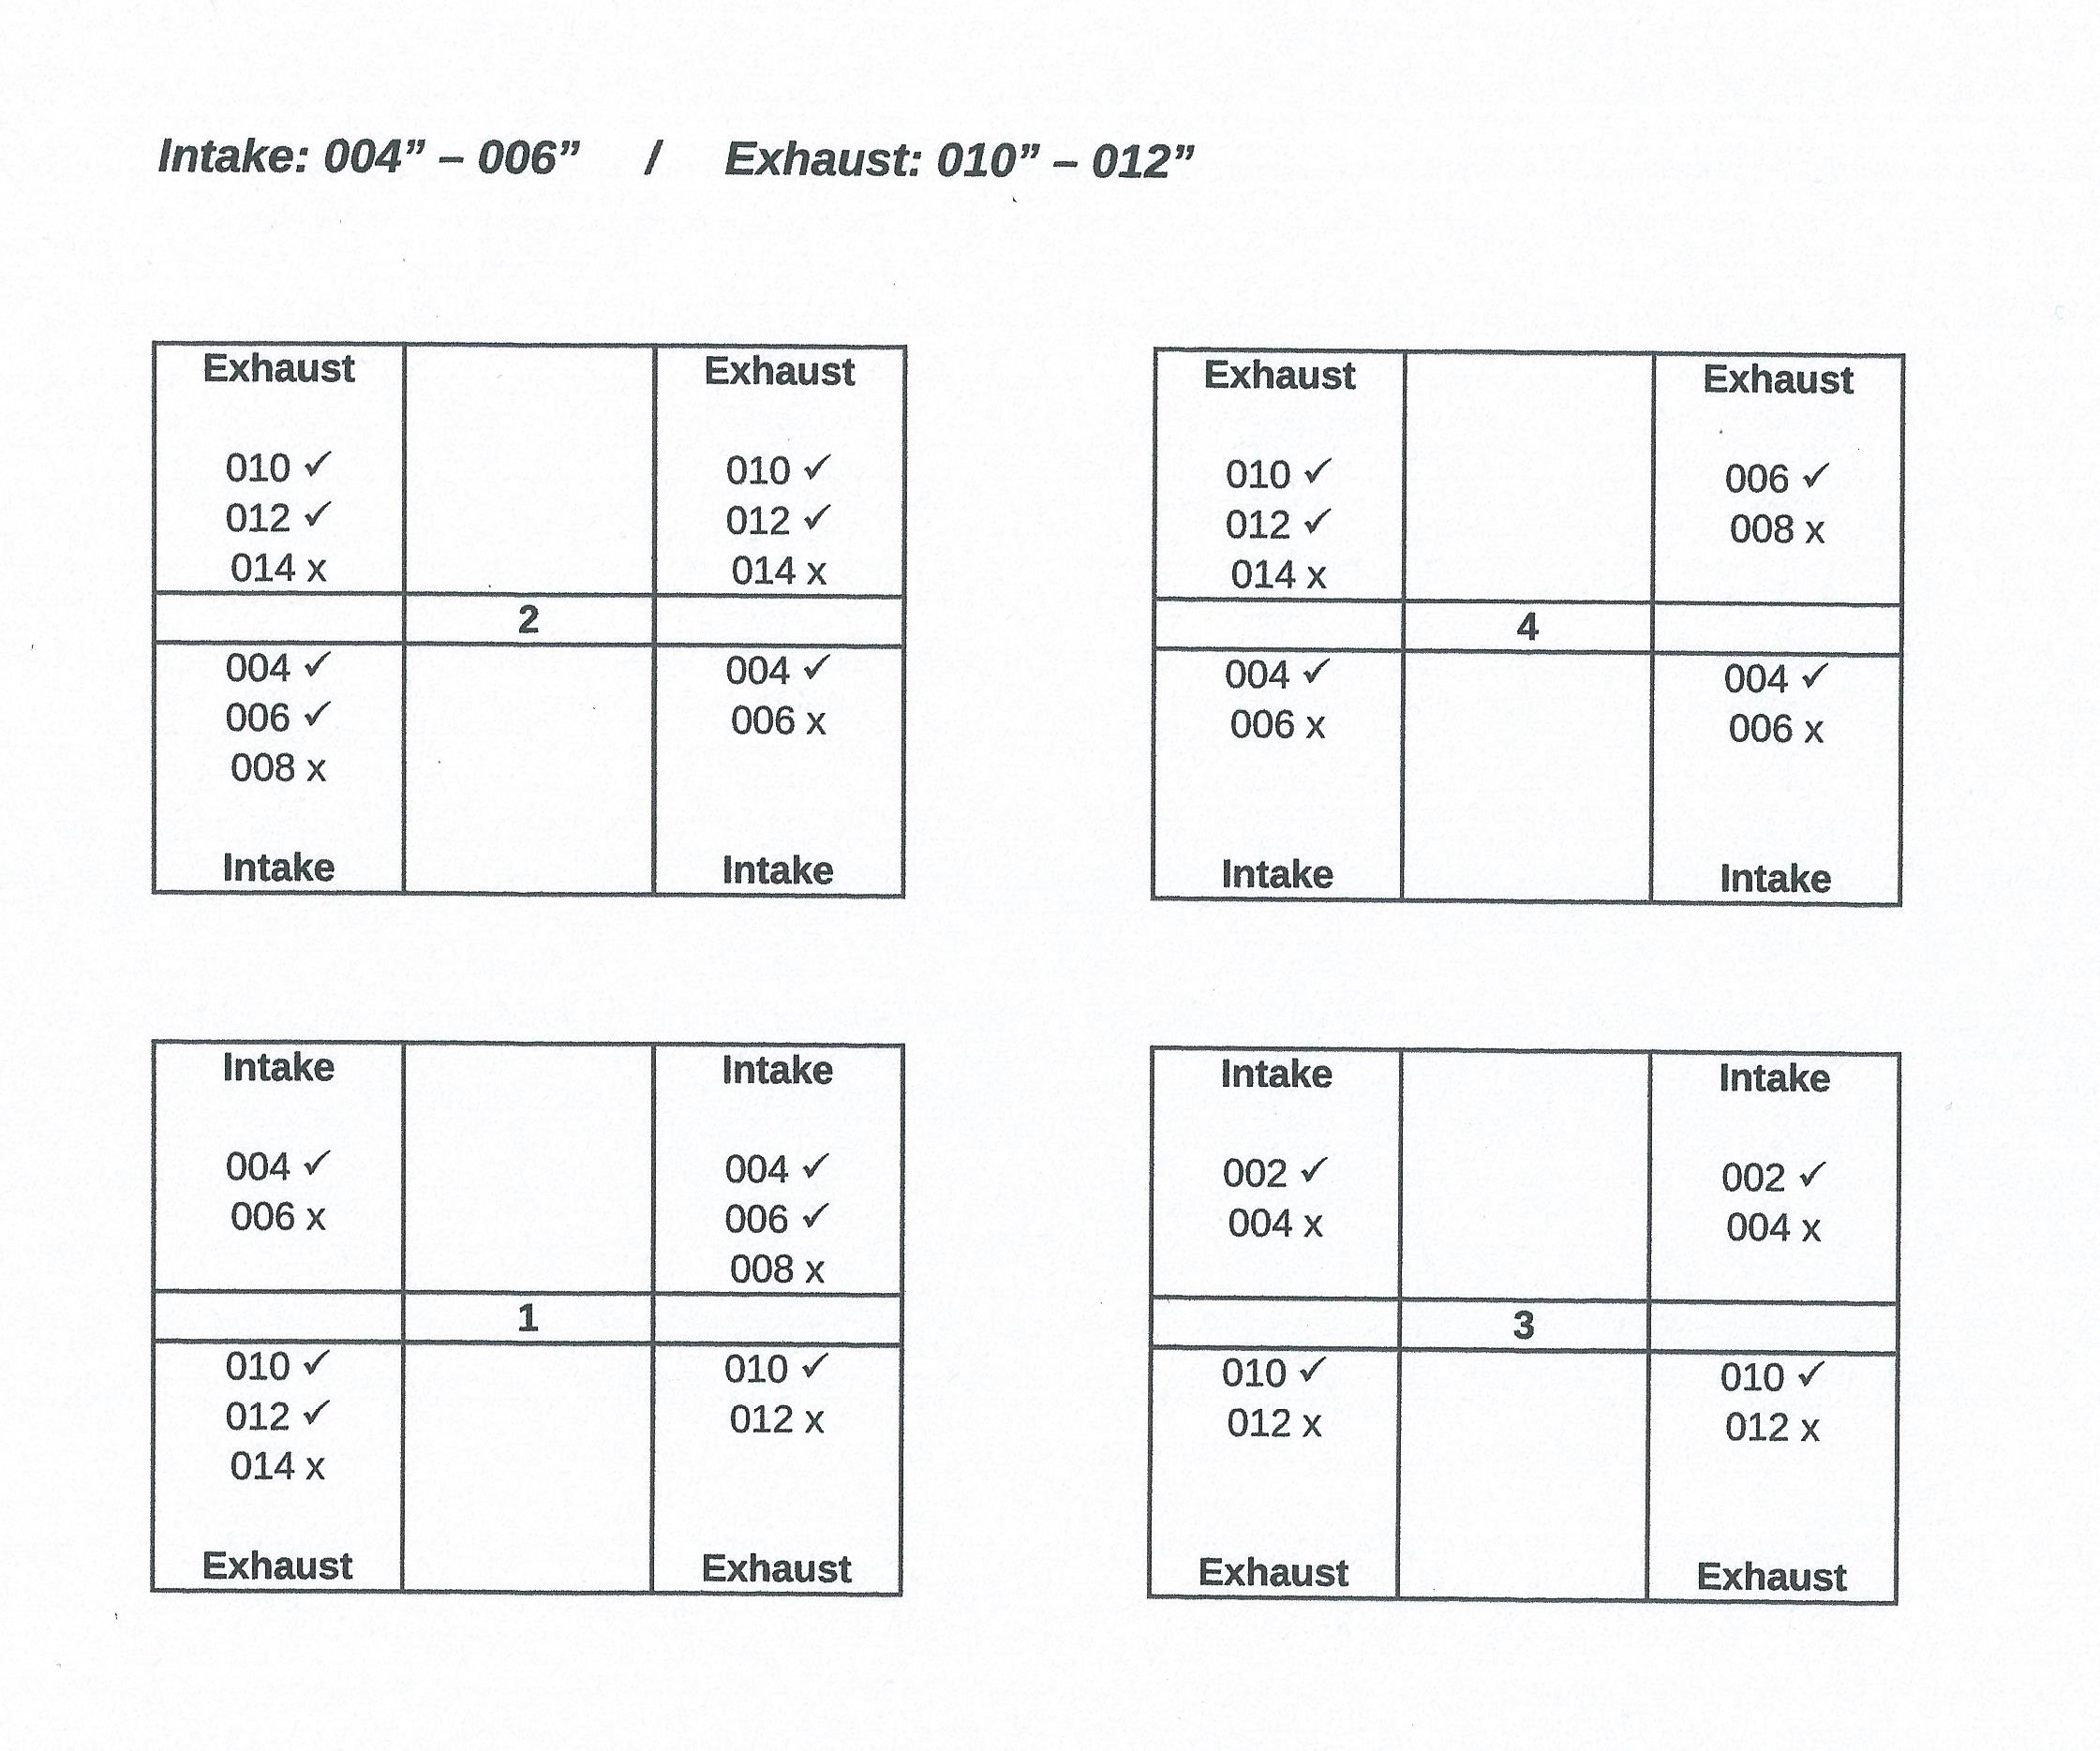
The bike is running well and without problems as far as I can tell. Before I take all the shims out, I could use some guidance as in how to move forward.
 
Oh... Okay... I've used the Haynes manual layout:

IMG_20190114_143932.jpg

As for the measurements, I did it with a feeler gauge that could only read 002, 004, 006, 008 etc.

So the measurements with an "✓" are the ones where the corresponding gauge would fit. The ones with an "x" didn't fit.
 
I'm glad you're wrong, because this is the very first time I'm doing something as difficult as this. You could tell me the earth is flat and I'd believe ya. :D
 
You can do it, take your time, ask questions, if you need-to, and we'll help you finish it up. Pictures always help. And, it helps to have the correct info.;)
 
Thanks!

Thus far, I presume that the following clearances are within spec:

#1 Left intake, Right exhaust.
#2 Right intake.
#3 Left & Right exhaust.
#4 Left & Right intake.

So the next thing would be to wait for the other feeler gauge and measure the out of spec ones again.

After that I can start pulling the (out of spec) shims.

Correct?
 
... wait for the other feeler gauge and measure the out of spec ones again...

See this thread: https://www.vmaxforum.net/threads/valve-adjustment.39525/

No... You need to measure them ALL again. The actual clearance is the largest gauge that will fit with a slight drag without galling. You MUST TRY the next larger gauge. If that gauge does NOT fit, you are on the money. "GO - NO/GO."

Shim adjusters require a separate step. After you insert the new shim, rotate the crankshaft to make sure oil has been squeezed between the shim and bucket before checking. Otherwise, the new shim may be too small.

You MUST use the Yamaha tool (or equivalent) referenced in that post.
 
Okay. Gained some more knowledge! I'll proceed as you described. I've got the official Yamaha tool.
 
Once you have ascertained the actual clearance you will need to remove the shims that are out of spec.
Note that the bucket has a notch in it and you may have to rotate the bucket to get it to the front. To get the shim out I find that a suitably sharpened electricians (i.e. narrowish width) screwdriver inserted under the shim via the notch works best.
They can take a bit of leverage to get them out due to wringing on to the top of the bucket (thus the sharpened screwdriver).
Another asset is one of those magnets on a stick doofas to extract the shim which will inevitably fall down behind the cam.

Once you have the shim out make a note of its number, replace it and do the same for the other out of spec shims.

With a bit of luck you may be able to swap some about to get the correct clearance.
 
Thanks! I hope the new gauge will arrive tomorrow. I'll make another scheme then. :D

By the way....

OEM shims are quite expensive. Is there an affordable (aftermarket) solution? Or should I bite the bullet and pay top dollar? After all... It isn't a job I'd like to repeat all to often. :cool:
 
Sean Morley has shim kits he will send to ya. Try emailing him.
When I checked mine a couple years ago I made a chart with the book specs on one column
and what my clearances were beside that and went to a local Yamaha mechanic and he indicated
which ones were out-of-spec far enough to change out the shims. I swapped out the shims with
his and it cost me exactly nothing.
 
I'm from The Netherlands, so I'll try something local first because of the postage. Thanks anyway!
 
Make sure you install each shim into the bucket with a screw driver or suitable tool. It should make a little bit of a snapping sound. Then roll the cam lobe over it a couple of times like mentioned. Printed face down. Seating them right is ultra important.
 
Thanks! I hope the new gauge will arrive tomorrow. I'll make another scheme then. :D

By the way....

OEM shims are quite expensive. Is there an affordable (aftermarket) solution? Or should I bite the bullet and pay top dollar? After all... It isn't a job I'd like to repeat all to often. :cool:
Some Japanese car engines, and many bikes use the same shims. 25 mm diameter, if memory serves me right. Here is one vendor. https://www.z1enterprises.com/engine-parts/shims/25mm-shims.html
 
Last edited:
The new feeler gauge arrived, so I started all over again with the measurements. This time I did it the right way. Made 100,000% sure the cams were aligned correctly. The line of sight is somewhat distorted if you look from an angle, as I did yesterday.

This time I fixed that:

IMG_20190115_172246.jpg

... and the results were much more to my liking:

IMG_20190115_175141.jpg
 
Back
Top