People loading their bikes without paying attention to clearance issues, often find they have broken the die-cast housing at the bottom. Then it's a 'fix' to use a remote filter with a cobbled-up assembly like that. Using a straight surface to get the bike into the back of a pick-up is one way it happens. The arched aluminum ramps are to provide more loading clearance. A longer ramp w/an arch to it helps to lessen the probability of breaking the oil filter casting and case.

You are using an out of date browser. It may not display this or other websites correctly.
You should upgrade or use an alternative browser.
You should upgrade or use an alternative browser.
Rebuild or engine swap?
- Thread starter Timbox
- Start date


Help Support VMAX Forum:
This site may earn a commission from merchant affiliate
links, including eBay, Amazon, and others.
Thanks again for the insight into these bikes. I would not have guessed that would have been a weak point (oil filter location) as I have not seen any other metric bikes with damaged oil overs. Lots of them will strip out of this type and many people do that. I can also see why someone would put a remote for ease of access and changing out the filter.
So here is the oil filter that the PO put on the bike.
OIL FILTER & REGULATOR MOUNT, SHOVEL & EVO
Just guess this will be fine for a flow rate and will work on the Vmax. I hope it will at least as I would like to use it on the replacement motor.
Other good news, the lien release paper work came through today, so one step closer to getting the bike back on the road.
SOHC Honda 750's were sometimes equipped with something like that, to equip them with an oil cooler. Pretty-sure I have one sitting around w/a cooler. Derale was one brand that sold those for a variety of bikes, popular in the 1970's especially for racers. Lockhart was another.
Last edited:
Man ,I wouldn't roll the flea bay dice for a motor. Talk to Kyle and Sean about witch way to go after you get yours down and opened up.Looking over the used motor inventory on the good old Ebay, I did find a good engine. It has warranty and guaranteed to be good, so that sold me. Now just need to move the bike from the table to the bigger colder shed to do the engine removal and swap.
Thanks for the link to the manual I will be reading up on how to pull the engine. As for the rest of the bike, looks like only the left rear turn signal is broken (have to love them old rubber mounting things) and the kill switch rocker is not working. At least the kill swx is broken on the "on" position, as the bike still has spark and tries to turn over.
Hoping the seller who I have contacted about their "running bike" might be nice and help offset the cost of the new used motor. I am not holding my breath as they did sell me a broken bike when they said it was not broken. They said they will be sending me a box of extra parts but not too sure if I should hold my breath on that one. More to come once I get the bike moved and deal with these wonderful Wisconsin temps.
Now you get to meet your factory issue Mod Monkey! Best thing to do is be patient/ tolerant and give up plenty of space for his spastic ricochet's once you start working that motor.
That is a little cryptic? I guess not knowing the lingo or what to look for when it comes to "factory issue Mod Monkey".Man ,I wouldn't roll the flea bay dice for a motor. Talk to Kyle and Sean about witch way to go after you get yours down and opened up.
Now you get to meet your factory issue Mod Monkey! Best thing to do is be patient/ tolerant and give up plenty of space for his spastic ricochet's once you start working that motor.
'Mod Monkey' means what you probably think, a desire to spend $$$ on your motorcycle.
The/that mod monkey is solely responsible for this type of insanity!That is a little cryptic? I guess not knowing the lingo or what to look for when it comes to "factory issue Mod Monkey"!


All I ever wanted was to get the bike back to decent running order.
During the teardown I was removing the gas tank, opened the gas cap and this strange vapor escaped as if waiting to be released.
It was if my shop had been transformed into some kind of pick-pocket force field.
I remember coming out all dirty, greasy and feeling..... sort of violated.
Hundreds , maybe thousands of lost hours and the threats from my girlfriends about "That bike or me, what's it gonna be!"
No my friend, nothing cryptic . Your Vmax came with a mod monkey in place of a complete original factory tool kit.
Gent
The red/orange custom is one of my favorites for modded VMaxes, and I usually prefer them close to stock appearance.

We call it the rabbit hole. I have a 2007 Bandit 1250S that I have gone down the rabbit hole with. It is way too much fun to ride, so that is my lets go have fun bike. I am sure the Vmax will be the same. I just wanted to have another V4 in my stable and have been looking for a good price range Vmax for yrs. It is nice to have one and getting it on the road for this summer is the plan.
This will get a K&N filter and stay with the 4 into 1 and for now (lol) that will be it.
This will get a K&N filter and stay with the 4 into 1 and for now (lol) that will be it.
Check your slide needles and compare them to the chart (thanks Sean, the second hand-written one), to see what you have in there. If you have the carbs off, check the main jet, standard in the USA is 152.5 Mikuni. Dynojet uses their unique numbering system, not the same as Mikuni. Going to 150 or 147.5 Mikuni usually helps the bike to run better if you have a 4/1.
The Dynojet Stage 1 setup is hard to tune, and is pretty-much useless, you're better-off staying stock instead of that. The Stage 7 can be tuned to keep the VBoost manifold butterflies, instead of replacing the butterflies with open tubing from the DJ Stage 7 kit.


The Dynojet Stage 1 setup is hard to tune, and is pretty-much useless, you're better-off staying stock instead of that. The Stage 7 can be tuned to keep the VBoost manifold butterflies, instead of replacing the butterflies with open tubing from the DJ Stage 7 kit.
Jack Hammer
Well-Known Member
Fleabay can be ok. You just need to ask a bunch of questions and decide what you want to believe. I've bought many cars there and never regretted those purchases. Win some, lose some.
The joke is on me. This is by far that hardest engine I have even had to take out of a motorcycle. I did read the manual and I found it lacking. I understand that it says not to try this with one person but I have several jack, bike lifts and a over head chain system.
Taking a break as the motor is still wedged in the frame. Just ever so slightly but yes will not come out.
Things I have learned and will take care of before I put the other engine it.
1. I will removed the rear tire and pull off the rear drive shaft. I earned this when I did my Mean Streak and I should have done the same thing. Trying to find the proper position to have the motor come forward enough to have the splines release was a issue.
2. Removed the front exhaust studs. This might not sound like the thing to do but I would guess it gives a little more play.
3. No place I found did it say take off the valve covers, well it seems you have to or I am really missing something.
Now that everyone is done reading that and lol, is there something that I missed? Some people have ground down the front right down pipe a little to allow more room for the motor to come out. I guess I could have done that.
A little food and some time to cool down and then back to it. Besides that the winter snow storm that will be hitting tomorrow night is already dropping snow. I guess that puts me in a bad mood too....lol Venting...
You are 'missing something.' Read these and then have at it.
https://www.vmaxforum.net/threads/engine-hoist-to-pull-motor.40486/#post-423956
https://www.vmaxforum.net/threads/removal-of-2004-motor-proc.52238/#post-526338
https://www.vmaxforum.net/threads/engine-hoist-to-pull-motor.40486/#post-423956
https://www.vmaxforum.net/threads/removal-of-2004-motor-proc.52238/#post-526338
Fastest time for me (and a friend) was about 1 hour. Most will take 3-4 hours or little longer as you fumble through it. But it's not hard if you follow my steps below.
Removal of the Vmax engine in 20 simple steps!
*Note - many of the steps listed can be done in alternate order.
**I also may have missed some minor stuff and will update this as needed.
***Eventually I will put pictures with each of the steps
1.) Put Bike on Centerstand, ATV Lift, or Alternate Method
*If centerstand is available, this is easy!
**If no centerstand then see notes in swingarm removal for additional tips that you can use later.
2.) Unhook the Neg Cable from the Block
*Located Right Rear of engine
3.) Remove Cosmetics
a.) Scoops
*Don’t forget about the plastic heat shield on the coolant junction as this is easy to lose
b.) Side Covers
*right side optional
c.) Faux Tank
d.) Front Seat Section
e.) Remove lower intake covers
*#3 Phillips and DO NOT use the Hand Impact Driver as this will break the intakes
4.) Remove Exhaust
a.) It’s all got to come off and sometimes it isn’t fun
b.) If you still have the stock exhaust you’re probably going to break the small screws holding the rear heat shielding on
*The stock mufflers are HEAVY and be careful If you don’t want to ding them up.
**Don’t forget about the bolt underneath near the centerstand if you still have the stock mufflers
5.) Drain Oil
a.) Though this can be done anytime you’ll have more room with the exhaust out of the way.
***There are additional places that oil will drain from then just the pan so save it aside for now.
6.) Drain Coolant
a.) The drain plug on the bottom of the waterpump is a good place to start.
b.) An additional place to drain fluid from is under the cylinder cover plates.
*These are located just under the head on each cylinder
**Use a manual impact to get the countersunk allen loose
***Use a spark plug to remove (and install) the plugs that are located under the plate
****Coolants going to run all over the place so I hope you have a good drain pan
*****A large baking pan actually works well!
******Reinstall the plugs anytime to keep things clean while you’re removing the engine.
c.) Remove the drain cock from the t-stat housing. One bolt holds it on.
*You can remove the cock completely if desired. Just held on now by the two small hoses
d.) Unhook the large hose from the radiator to the tstat housing
*You can remove the radiator if desired but not required
e.) Unhook the small hose from the coolant junction tube (leads to the area near the left front carb)
7.) Disconnect the clutch line connection
a.) This is at the left rear of the engine. It’s going to drain fluid so where’s your pan?
b.) Tie the hose up to the frame out of the way (after it’s drained)
*You can zip tie a baggie on the end with a paper towel inside to catch any residual that will inevitably drain.
**Alternatively, You can remove the mid gear cover and remove the entire slave cylinder as an assembly.
***If removing the slave you need to be straight on with the allen wrench as those bolts get corroded in the block
8.) Remove the Pegs/Mounts/Shifter/Brake
a.) The Left Side peg is easy
b.) To remove the shifter you need to take the two bolts holding the main bracket (passes through the mid gear cover)
remove the pinch bolt in the splined shaft clevis.
*Note the small “dot” on the end of the shift shaft and it’s relation to the pinch area of the clevis.
c.) Remove the right side peg. The brake pedal can stay attached.
*You will need to unhook the spring from the brake light switch
**OR remove the bolt through the bracket and let the whole mess swing aside
***If you opt to remove the pedal and peg completely just note the spline alignment mark and pinch area relationship
d.) Remove the 2 bolts holding the rear brake master. Pull the whole mess rearward and tie in place out of the way.
9.) Remove the mid gear cover
a.) Remember the drain pan, you’re going to need it! The bottom most bolt should have a copper washer on it to seal the block.
*There is another drain bolt back under this cover if you want to get more oil out of the block.
10.) Unhook the electrical under the left side cover
a.) Stator Wiring Connectors (3 wire connector)
b.) Pickup Coil Connector (2 wire orange/black for 90-07, or a 6 wire connector (*5 wires used) for 85-89))
*This connection point will be up nearer the back of the battery
c.) Oil level and Neutral Sensor wires (Bullet Connectors)
*These are the only connectors you can mix up back here so label em or swap around if you hook em up wrong later
d.) Remove starter wire from solenoid located on top of battery (big thick wire - Black in color NOT red).
*Remove bolts holding rear coil bracket if needed.
e.) Side Stand Switch (2 wire connector)
*All wiring except the side stand switch needs to be coiled up and zip tied to the engine
**The guide for the clutch line works well for this.
11.) Coil up the side stand switch wiring out of the way to the frame, then Reinstall the Mid gear Cover with a couple of bolts or all 4.
*Don’t forget that the bottom bolt is the one with the copper washer.
12.) Remove the rear brake caliper
a.) Just remove the two bolts, and unhook the hose so it can “hang” in place. Zip tie up if desired.
13.) Remove the rear wheel/swingarm/shocks
a.) Shocks are optional for removal from the frame
b.) The entire mess can be removed at one time or one part at a time.
*it’s all going to go back together one part at a time (though I can do it as one assembly - most can’t).
c.) Remove the two pivot bolts (one under each chrome cover).
*The right side has a jamb nut to loosen first
*The left side has a locking tab that needs bent up first
d.) If removing as a complete assembly just roll it on out.
*The front is going to fall down so be careful.
**If left together leave the front of the differential pointing up since it will drain fluid otherwise
***You also can’t leave the rear diff laying flat - it will also leak out of the front.
14.) If you don’t have a centerstand this is a great opportunity to prop the bike up.
a.) Using 2 long bolts through the original muffler mounting holes you can set this on jack stands or an ATV type lift
15.) Remove the Middle Drive Gear
a.) Remove the rubber surround first. Just pull it off.
b.) The drive gear assembly is the part with the ujoint sticking off the back of the engine. 3 Bolts and a tug (You are good at tugging!)
*There are some shims that will also fall out - don’t lose them.
**You can loosen the 2 bolts on either side of the assembly from the top down if needed.
***Be careful if you pry on the flange since it’s not super strong.
16.) Remove the carbs/airbox
a.) Remove the screws holding the overflow tubes to the top of the airbox
*Put the screws back in the airbox so you don’t lose them
b.) Give the airbox a yank and it should come right out.
*You should loosen the clamps at least by the time you have it out so the boots don’t deform too badly while you fix the engine.
c.) Of course you need to unhook the fuel line - draining the carbs is optional
d.) Getting the carbs out of the intakes can be a challenge (especially if it’s cold out).
*Use a hair dryer to warm up the boots. This will great aid getting them out.
e.) Unhook the throttle cables from the junction box under the left neck cover.
f.) Slide the carbs out the left side
*don’t turn them on the side or upside down unless you want fuel to pour out!
g.) Unhook Vboost Cable. One long special shaped Phillips screw.
**intake can stay on if desired if only doing something like trans repair.
h.) Unhook vacuum hose from left front intake
17.) Support the engine for removal
a.) A simple floor jack works well. You can either put a small section of plywood down or jack right on the oil pan.
*Optimal placement is where the jack catches the pan front fins and the pan rear fins.
**Just enough pressure at this point to have the jack touching but not lifting the engine.
18.) Remove the frame cross support from up front
a.) This is where the horn is mounted. Just unplug the horn - no need to unbolt it from the bracket.
*You may need to loosen the main bolts holding the right lower frame section in place
**If you have engine guards they need to come off at this time too.
***Three bolts per side.
19.) Remove the frame/engine access section, and left side support
a.) You’re almost there.
*2 Bolts up high, 1 Nut on the upper mount, 2 Allen bolts at the rear (behind the peg area), and 1 Big Bolt in the rear.
b.) Remove the “triangle” front the left side. 1 Nut on the mount and 2 bolts in the frame.
c.) Remove the large bolt in the left rear engine mount
20.) Remove the engine!
a.) Jack the engine up with attention to the valve covers as well as rear engine mounts.
*The engine mounts on the rear need just enough clearance to slide out.
**If the valve covers want to hit first then you need to reset the jack a little rearward.
b.) With the engine up just enough to clear it should slide straight out to the right.
*You can sometimes tilt the engine at the top if needed or even slightly turn the engine at the front out of the frame.
21.) Reinstall the swingarm for chassis mobility
a.) If you want to have the chassis able to roll around simply put the swingarm assembly back in place.
*For you smart guys that read the beginning and see I said 20 steps. This 21st step is not part of the engine removal lol!
Jack Hammer
Well-Known Member
What they said. To me, the concept of removing the engine from a Vmax is more likely removing the frame and stuff from the engine. It is not difficult. You can make it difficult for yourself but don't over think it.
Once the weather turns a little warmer I will remove the rear of the bike and take swing arm off. I am sure that will be the trick and it will go in much better then it came out.
I have to change out the rear exhaust fasteners before I put the engine in anyway, so a few things to look over before the engine to back in. That and the snow keeps falling and the temps are not nice to work in the shed.
I have to change out the rear exhaust fasteners before I put the engine in anyway, so a few things to look over before the engine to back in. That and the snow keeps falling and the temps are not nice to work in the shed.
Pulled the head off the old engine to look at #3.
[url=https://flic.kr/p/2ojdNm1]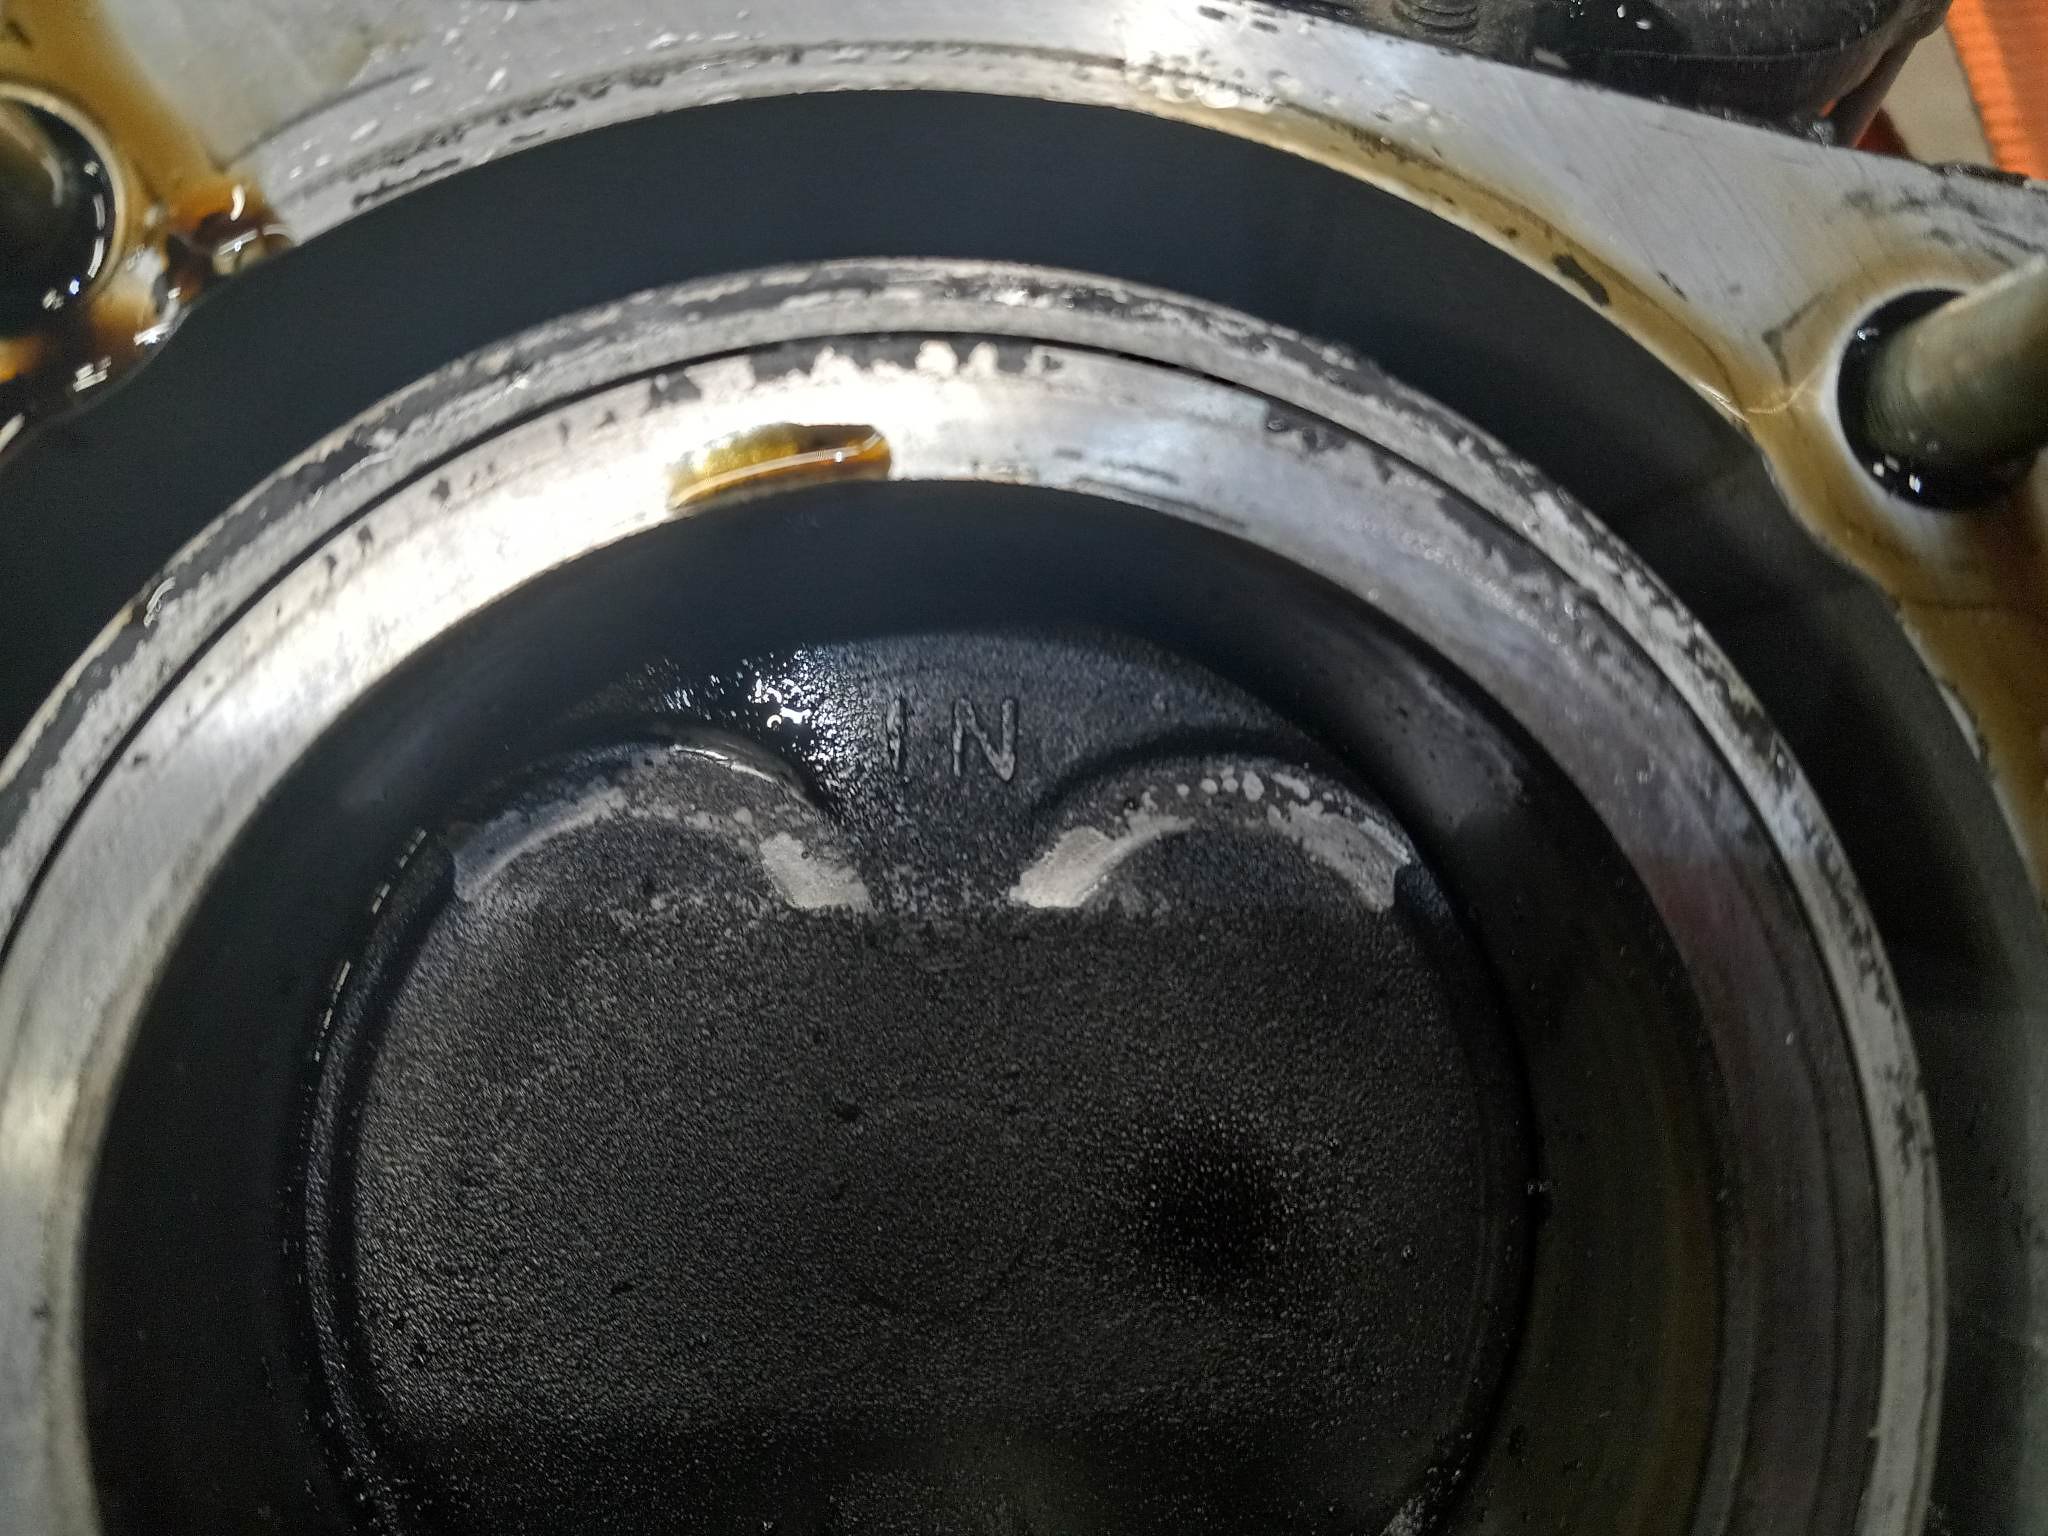 3 by Tim Brown, on Flickr[/URL]
There was some contact there, not much as I didn't run the engine long once I head metal on metal.
Now I understand why you want to removed the U joint from the rear of the engine when you are install and removing.
[url=https://flic.kr/p/2ojdNnt]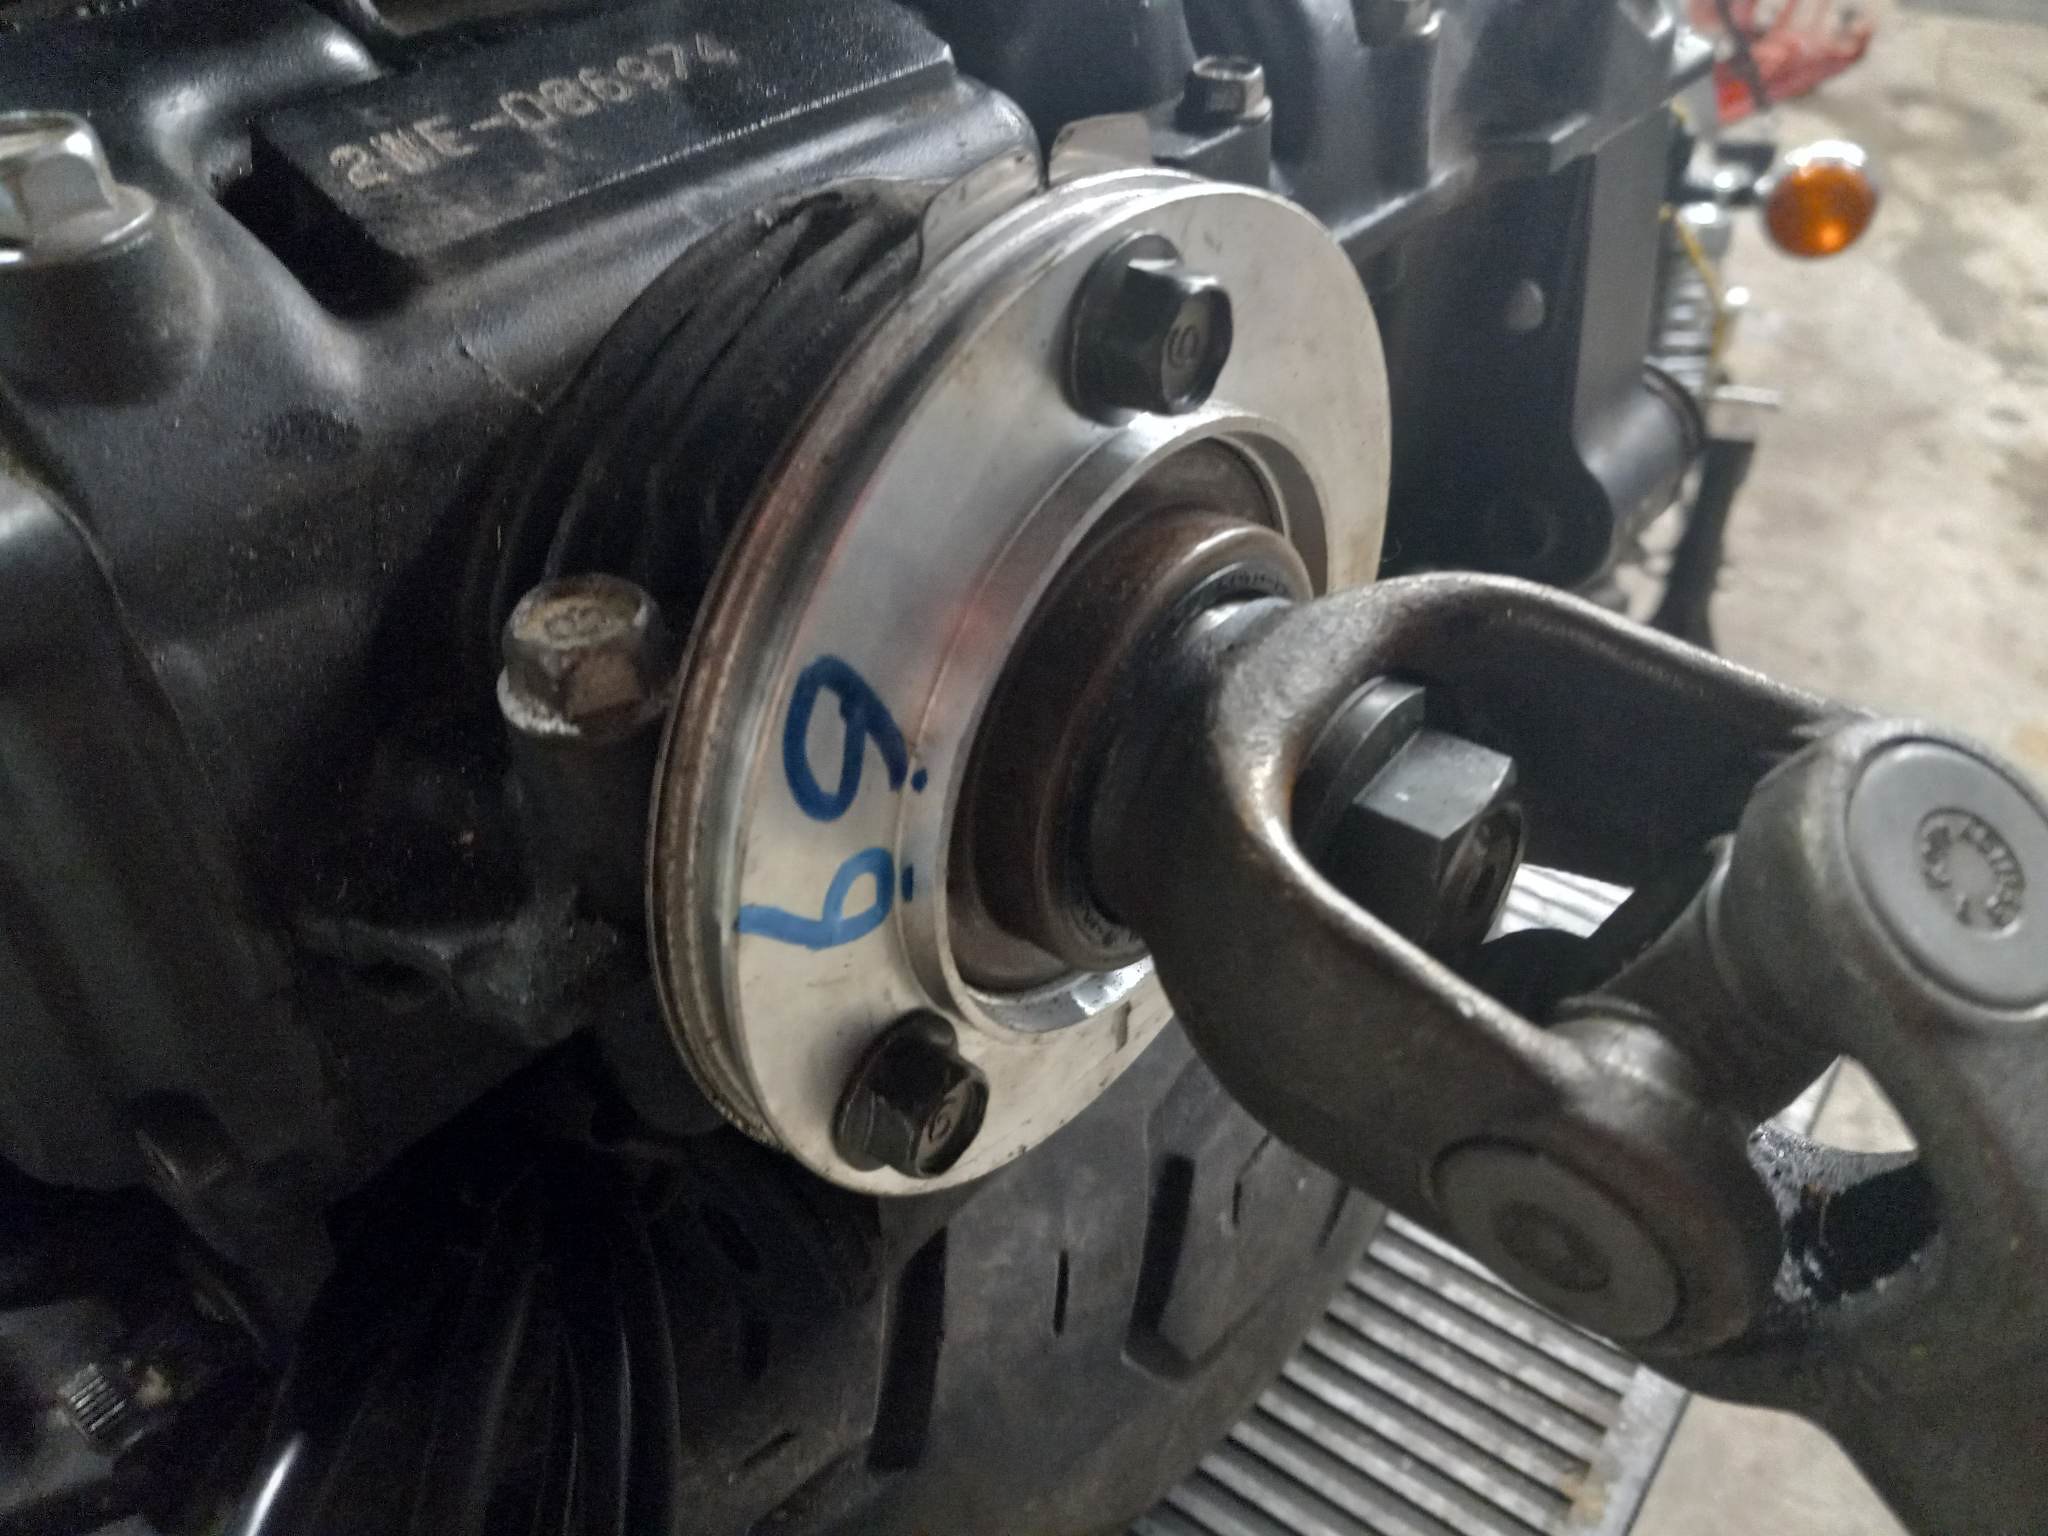 1 by Tim Brown, on Flickr[/URL]
[url=https://flic.kr/p/2ojge3i]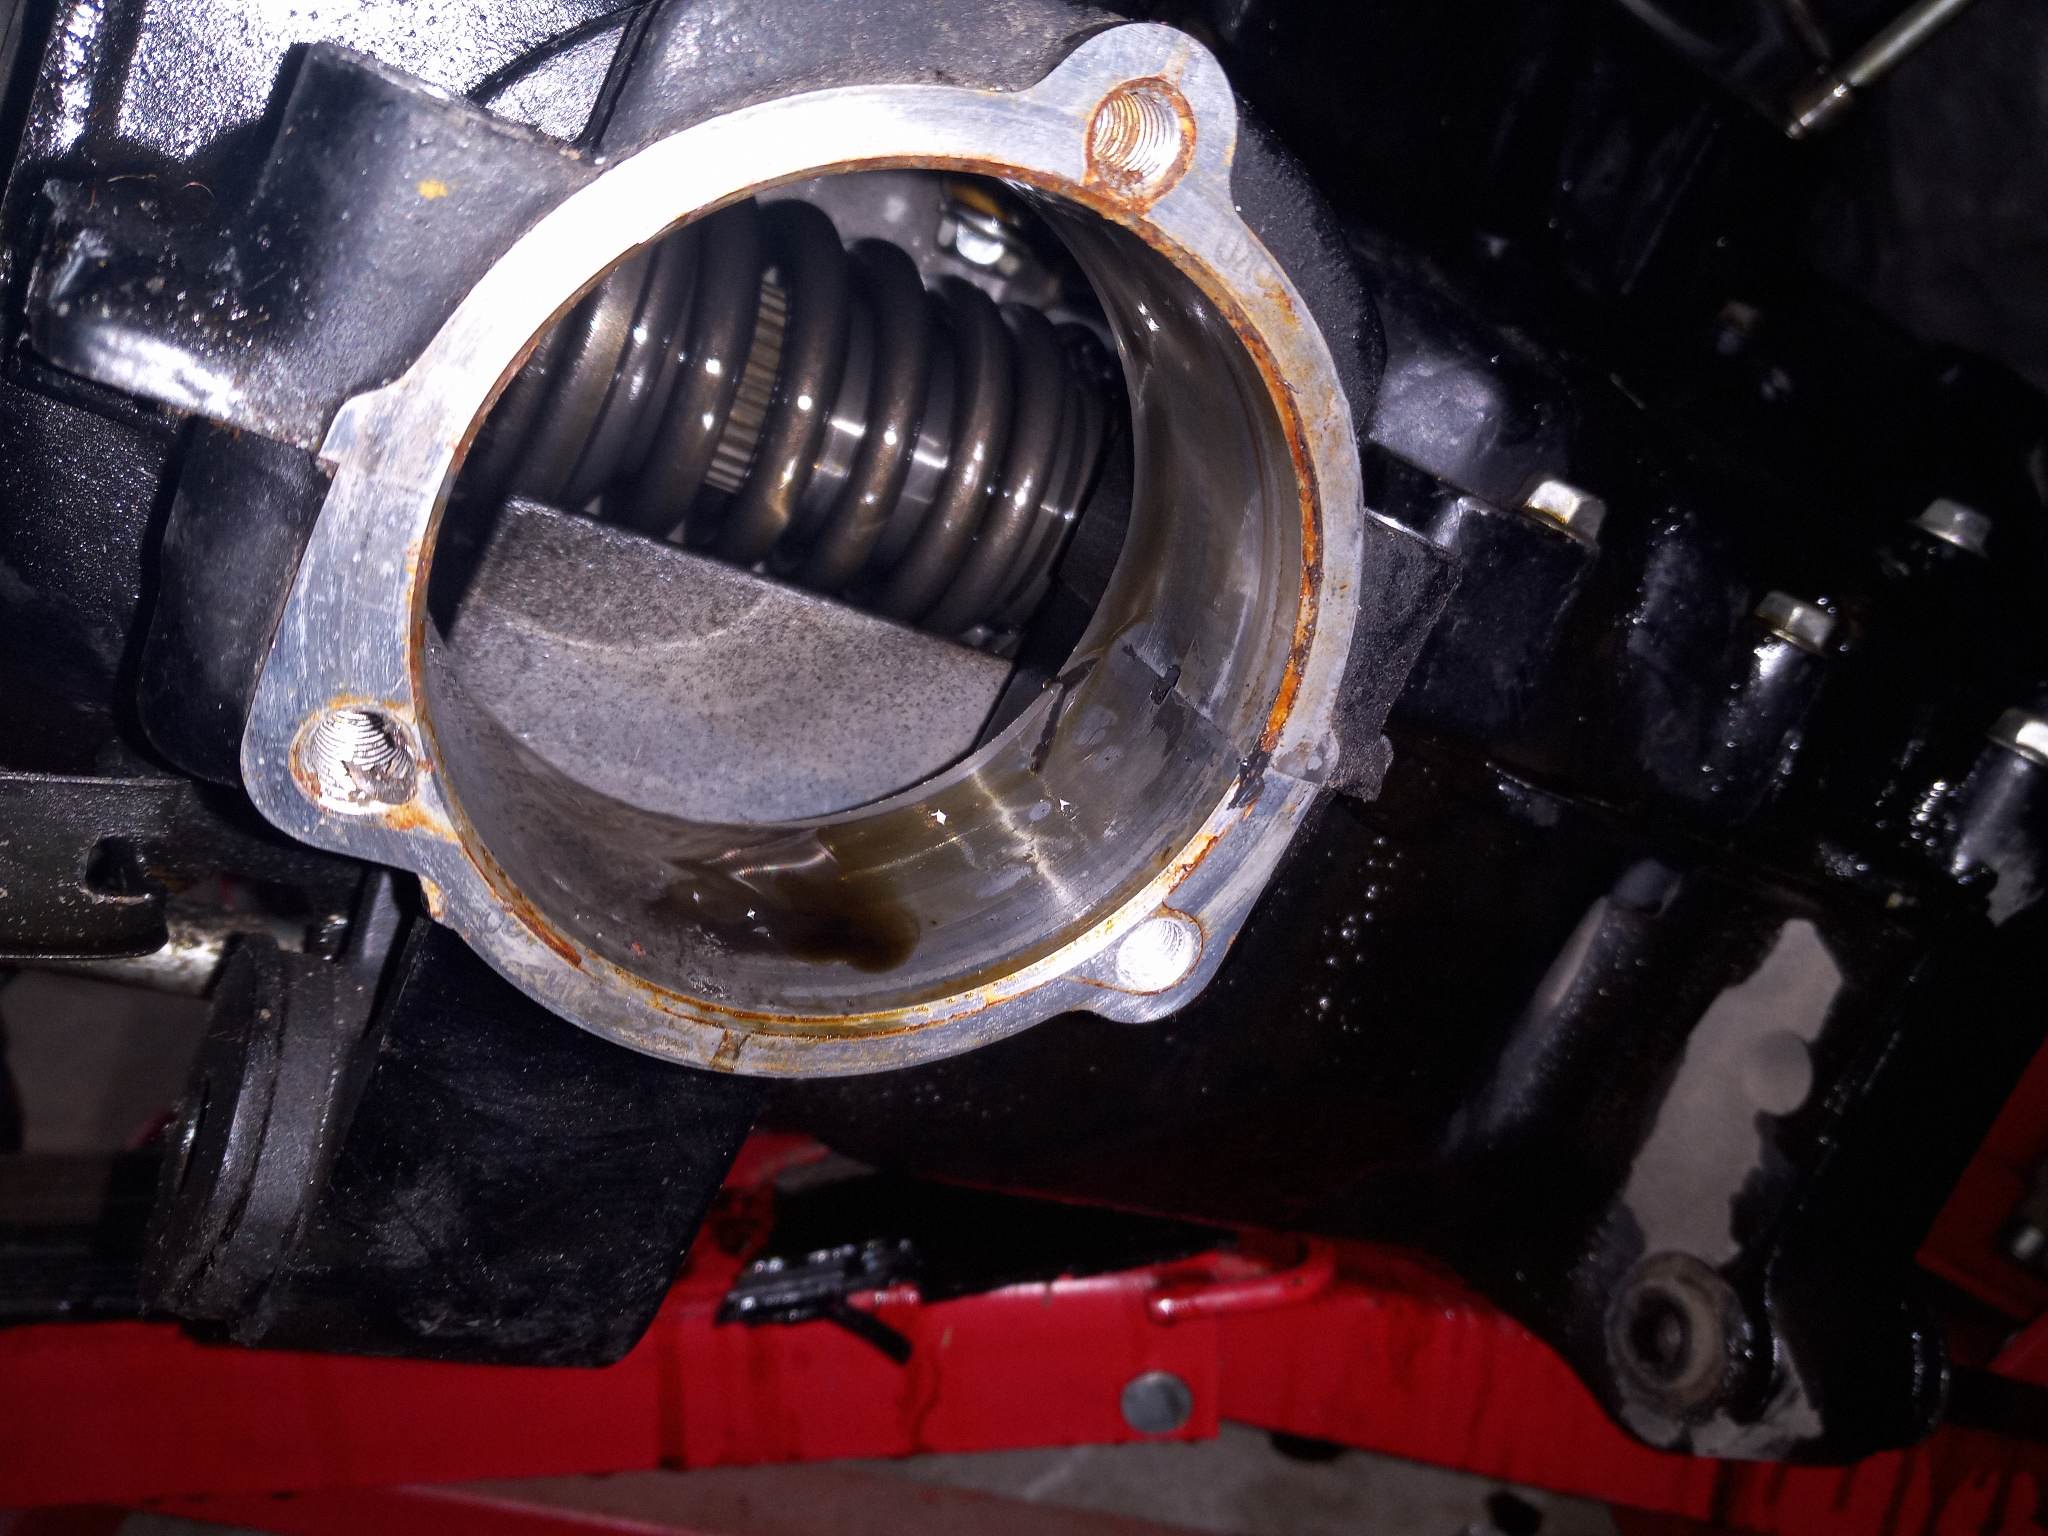 2 by Tim Brown, on Flickr[/URL]
That is a lot of extra space. I can also see why you have to remove the swing arm as you have to put the U joint back on once the engine is in place again. Thanks to all that have sent the steps. Those steps should be put into the next reprint of the manual.
[url=https://flic.kr/p/2ojdNm1]
 3 by Tim Brown, on Flickr[/URL]
There was some contact there, not much as I didn't run the engine long once I head metal on metal.
Now I understand why you want to removed the U joint from the rear of the engine when you are install and removing.
[url=https://flic.kr/p/2ojdNnt]
 1 by Tim Brown, on Flickr[/URL]
[url=https://flic.kr/p/2ojge3i]
 2 by Tim Brown, on Flickr[/URL]
That is a lot of extra space. I can also see why you have to remove the swing arm as you have to put the U joint back on once the engine is in place again. Thanks to all that have sent the steps. Those steps should be put into the next reprint of the manual.
Pistons don't contact the valve unless the bearings spun (which distort and ruin non serviceable features on the block).
So you are saying that if a connecting rod let lose and left the piston in there free, that the piston would not travel outside the normal limits? If the piston did get forced down maybe lower then it normally would be allow, then the broken connecting rod strikes the bottom of the piston, what is to hold it from reaching the valves? Just want to make sure when you say it can't make contact but there was signs of it on the piston pic above.
Good day, thanks to all the help on prepping the bike the right way, engine went in with ease. I only had a little use getting the drive shaft lined up and into place. Besides that, I had to modify the lower front engine brace to allow for the 2003 spin on oil filter. Just a little grinding to allow for clearance. Then added some steel inside the tube to take up room. Welded that all up and ground it down.
Next the exhaust and then torque all to spec. I will take a look at the carbs even though she did start with the old engine in her and seemed to be running on all 4.
Last edited:
The rod breaking would of course allow for all sorts of possible mahem. Usually the result is a windowed block and complete devestation (example picture attached of that kind of damage and other oh shit moments including a picture of the same damage you pictured). BUT, it's very unlikely to break a rod and so rare that i've only ever seen a few examples of that happening (pics included of the only two times i've seen it). What usually happens is the bearings "spins" and doubles up on one side of the rod and creating more piston travel where it can contact the valves. Seen that MANY MANY times. When you get a spun bearing it generally not only damages the rod and crank journal but the side loads distort the main saddles and thrust surfaces of the block which does not have a replaceable bearing like other brands do (and most cars do).
So, when you rebuild a spun bearing Vmax block you can either machine and add in a bearing surface (which is cost prohibitive) or scrap the block (cheaper). Plus they don't make oversize bearings to simply turn the crankshaft like you would a car so you either get a higher cost to rebuild and machine the crankshaft OR simply get another one (cheaper).
So, when you rebuild a spun bearing Vmax block you can either machine and add in a bearing surface (which is cost prohibitive) or scrap the block (cheaper). Plus they don't make oversize bearings to simply turn the crankshaft like you would a car so you either get a higher cost to rebuild and machine the crankshaft OR simply get another one (cheaper).
Attachments
-
 IMG_20130907_160417_506.jpg1.4 MB · Views: 0
 -
 Trashed Crank.jpg883.6 KB · Views: 0
 -
 Ripped Rod.jpg28.1 KB · Views: 1
 -
 IMG_20191227_142721.jpg5 MB · Views: 1
 -
 IMG_20170121_134441465.jpg2.6 MB · Views: 1
 -
 IMG_20150221_163518_049.jpg1.2 MB · Views: 1
 -
 Dropped Valve.jpg327 KB · Views: 1
 -
 Broken Parts 016.jpg2.2 MB · Views: 0
 -
 Broken Parts 011.jpg2.1 MB · Views: 1
 -
 Broken Parts 001.jpg2.2 MB · Views: 1
Similar threads
- Replies
- 7
- Views
- 651
- Replies
- 18
- Views
- 1K
- Replies
- 3
- Views
- 688