RaWarrior
Well-Known Member
After the recent bout of douche-baggery from UFO, I decided it was a good excuse to get rid of the UFO tail light that came on my bike, which I never particularly liked anyway. Didn't think the oval shape "went" with the bike.
I started looking around for a replacement and found the monstermax unit, which I thought looks very cool, but at $350 and a 6-8 week lead time, that was waaaaay out of budget, since my budget was, as usual, as close to "nothing" as I could get.
Sean sent me a few suggestions and I checked out the midwest MC catalog, but didn't really see anything that struck my fancy.
I came upon this universal tail light on ebay, which I had also used for my quasi-legal minibike project. Taking a few quick measurements, I found it to be almost exactly the same width as the UFO unit that was there, but it's sleeker, and also noticeably brighter. Installing it actually turned out to be exceedingly painless also. I only remembered to snap a couple photos, but it's pretty straightforward.
First off, I removed the two bolts holding the old light in, behind and above the license plate. The light comes loose, but is still held pretty much in place by the wiring. To get at that, you'll have to separate the inner metal and outer plastic fender. Remove both the front and passenger seats. Under the passenger pad, there's two larger bolts(12mm) on the outside and a smaller one(10mm) in the center that hold the fender on, and pass through both inner and outer. Remove all three and the fender will come loose. Now to separate the inner/outer, there's two philips screws at the very back. Remove those and the halves will come apart, revealing the taillight wiring sandwiched between them. You'll also get a black plastic trim piece that goes around the light. I just cut the taped bundle several inches away from the light and set it aside.
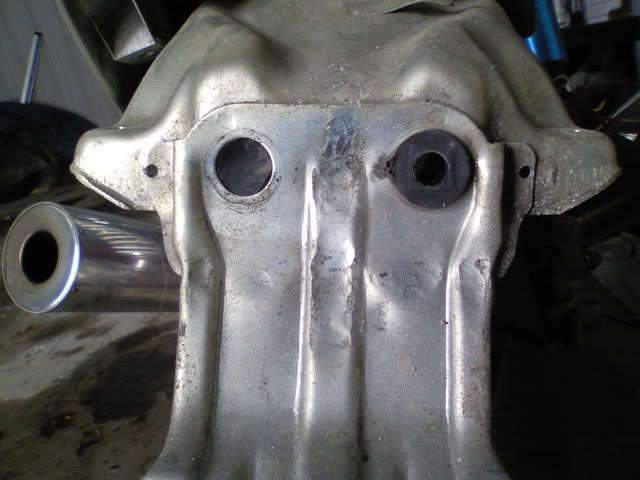
The ebay light has two small studs for mounting, with a grommet off to one side that seals the wires coming out. Remove the left OEM grommet, and remove the metal spacer for the right one, but leave the rubber. The rubber "nub" on the ebay light that seals the wires is on the left side, and is exactly the same thickness as the original rubber on the right, so it sits perfectly straight.
Also fortunately, the studs on the ebay light perfectly match the width of the "lower" part of the taillight/plate bracket. I eyeballed it and got a perfect fit the first time. Drill two 1/8" holes at the very edge of this "lower" part, as in the photo below.

Now, its a simple bolt on. The light's rubber nub and the one original rubber space and hold it securely in place perfectly level and straight. On this light, the black was ground, blue was running light and red was brake.
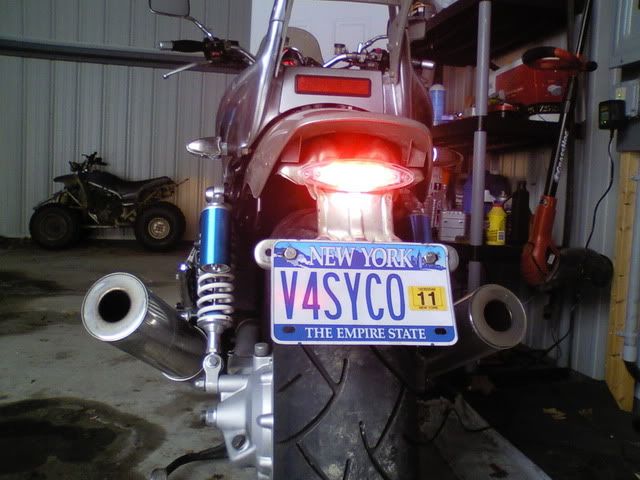
Here's what it looks like now. I'm planning to cut the plate bracket and shorten it up so the plate sits immediately under the light instead of hanging down a ways. The black trim piece looked weird with this slimmer light, so I got rid of it entirely.

I'm pretty sure the light output is higher than the UFO, and the lens on it makes it more "noticeable" as well....it reflects and scatters the light better. Before the UFO light made a roundish red spot on the wall behind the bike, maybe a foot wide where it's parked. With this one it lights up the entire space behind it evenly. I've had one of these lights on my minibike for a while, and it's severely beat on through sand, mud, dust, water, ect, it's mounted directly to the frame on a hardtail and I've had no issues with it, so the quality seems to be pretty good. When it's off it appears completely clear. Clear LEDs that light up red behind a clear lens. There's a few white ones facing downward for a plate light.
So, a cheap, IMO stylish tail light that happens to be easy to install. You can't see the inner fender unless you squat down directly behind the bike, as in the photo. From a standing position, it looks just like always so I don't really care a bit of the fender is exposed.
I started looking around for a replacement and found the monstermax unit, which I thought looks very cool, but at $350 and a 6-8 week lead time, that was waaaaay out of budget, since my budget was, as usual, as close to "nothing" as I could get.
Sean sent me a few suggestions and I checked out the midwest MC catalog, but didn't really see anything that struck my fancy.
I came upon this universal tail light on ebay, which I had also used for my quasi-legal minibike project. Taking a few quick measurements, I found it to be almost exactly the same width as the UFO unit that was there, but it's sleeker, and also noticeably brighter. Installing it actually turned out to be exceedingly painless also. I only remembered to snap a couple photos, but it's pretty straightforward.
First off, I removed the two bolts holding the old light in, behind and above the license plate. The light comes loose, but is still held pretty much in place by the wiring. To get at that, you'll have to separate the inner metal and outer plastic fender. Remove both the front and passenger seats. Under the passenger pad, there's two larger bolts(12mm) on the outside and a smaller one(10mm) in the center that hold the fender on, and pass through both inner and outer. Remove all three and the fender will come loose. Now to separate the inner/outer, there's two philips screws at the very back. Remove those and the halves will come apart, revealing the taillight wiring sandwiched between them. You'll also get a black plastic trim piece that goes around the light. I just cut the taped bundle several inches away from the light and set it aside.
The ebay light has two small studs for mounting, with a grommet off to one side that seals the wires coming out. Remove the left OEM grommet, and remove the metal spacer for the right one, but leave the rubber. The rubber "nub" on the ebay light that seals the wires is on the left side, and is exactly the same thickness as the original rubber on the right, so it sits perfectly straight.
Also fortunately, the studs on the ebay light perfectly match the width of the "lower" part of the taillight/plate bracket. I eyeballed it and got a perfect fit the first time. Drill two 1/8" holes at the very edge of this "lower" part, as in the photo below.

Now, its a simple bolt on. The light's rubber nub and the one original rubber space and hold it securely in place perfectly level and straight. On this light, the black was ground, blue was running light and red was brake.
Here's what it looks like now. I'm planning to cut the plate bracket and shorten it up so the plate sits immediately under the light instead of hanging down a ways. The black trim piece looked weird with this slimmer light, so I got rid of it entirely.

I'm pretty sure the light output is higher than the UFO, and the lens on it makes it more "noticeable" as well....it reflects and scatters the light better. Before the UFO light made a roundish red spot on the wall behind the bike, maybe a foot wide where it's parked. With this one it lights up the entire space behind it evenly. I've had one of these lights on my minibike for a while, and it's severely beat on through sand, mud, dust, water, ect, it's mounted directly to the frame on a hardtail and I've had no issues with it, so the quality seems to be pretty good. When it's off it appears completely clear. Clear LEDs that light up red behind a clear lens. There's a few white ones facing downward for a plate light.
So, a cheap, IMO stylish tail light that happens to be easy to install. You can't see the inner fender unless you squat down directly behind the bike, as in the photo. From a standing position, it looks just like always so I don't really care a bit of the fender is exposed.


