Polishin the alloy

VMAX  Forum

Help Support VMAX Forum:

This site may earn a commission from merchant affiliate links, including eBay, Amazon, and others.

02GF74

Well-Known Member
Joined
Mar 26, 2020
Messages
1,554
Reaction score
738
Location
UK
Since my newly acquired Vmax is 22 years, not surprisingly there is a bit of corrosion on the alloy parts.
I'll list the areas that could do with tidying up. What is the best way for the following:
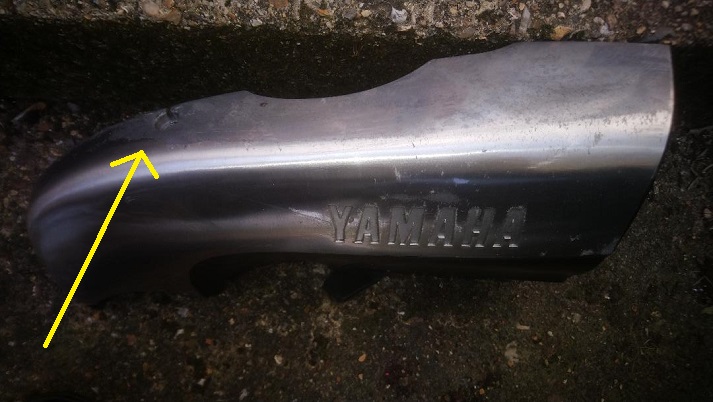
1. air scoops (incidentally the left one is blanked off - looks factory fitted so is just for show?) The upper half on the RH one the top looks to be bare alloy. Are these anodised as the top is a different colour to the side part, arrow points to where the wear line is.
2. round carb covers
3. engine (does the cylinder head with the valve gear have a rougher casting compared with the barrel? I ask as the black paint on the two is different, the paint on the barrel being much smoother). Sand down the shiny alloy flat surfaces and leave or paint with heat resistant lacquer?
4. the exhaust covers - as above?

scoop.jpg
 
All of the 'bare' alloy would have been lacquered but it is not unusual for PO to remove this once it starts to get tatty.
Whilst I stand to be corrected yours would originally have had a lacquered top of the scoops and the lower part satin black.
Both 'scoops' are dummies and play no part in the induction system.

It would have looked something like this:

upload_2020-3-27_14-46-37.jpeg

From what I remember the heads do have a different appearance to the barrels (mine where re-painted aeons ago) plus I think the casting around the cams (not the cam covers) is rougher.

So what to do.
I guess it depends on what you want to achieve. If you want the show winning mirror finish then that may be beyond most of us mortals and probably best left to the pros.
For the rest of us I would first get a range of wet and dry papers (typically 600/1000/1500/2000 git) plus a good rubber rubbing block.
Try with the finest grit first, if this gets rid of any blemishes reeesult.

I suggest this because if you start with (say) the 600 this will leave behind rubbing marks that will need to be removed by going over with the 1000 which will need to be removed with the 1500 etc.
In other words the finer the grit you can get away with the better.

However deeper blemishes may need a coarser grit to remove them.
Once you have a satisfactory finish after the 2000 grit you could either use even fine grit paper or cloth (e.g. 2500. 3000, 5000, 7000 or even finer)
Each use of a paper finer that the last will remove the scratches left by the previous grit. I know that Micromesh cloth is available up to 12000 grit by which time the finish should be as near a dammit mirror like.

Alternatively once the 1500 or 2000 git has been used move on to an alloy polish. Here in the UK I start with Solvol Auto Sol and complete the Job with Belgum Alu (other polishes are available).

As I implied earlier the standard of the finish is directly proportional to the effort you want to put in.

If you can, and the riding conditions the bike is put through allow it, I would leave the alloy uncoated. OK, you will have to polish it occasionally.
However if you have to ride it in all weathers then coating may be desirable.
Again, you gets what you pays for (i.e.durability). You can do it with aerosol cans, through two pack lacquer or clear powder coating. Yer pays yer money...
IMO none of the above looks as good as bare metal and once they chip and moisture gets in the snail trails appear.... which was probably why the original coating was removed.
 
wow - that a lot of useful info.
unlike a car, motorcycles have very few panels and I am not going for a concourse mirror finish, just a tidy up. I'll do it bit by bit but all of that can wait until I sort out carbs to get running and figure out why the vboost servo is not working. working from home, longer and warmer days and not being allowed out means I have plenty of time.
 

Latest posts

Back
Top