Looking good Dave ! I got the special paint additvie here for Christines today so after I finish the Harley I am gonna tear the 85 down for the hippie paint job.

You are using an out of date browser. It may not display this or other websites correctly.
You should upgrade or use an alternative browser.
You should upgrade or use an alternative browser.


Help Support VMAX Forum:
This site may earn a commission from merchant affiliate
links, including eBay, Amazon, and others.
PATMAX
Well-Known Member
Let's see that's 2,100 plus half of Kyles 90 plus... Oh never mind, it's the trip that's important Dave, not the destination or something like that. You know I'll give you $1,800 bucks for it when you get her all done! LOL
Hang in there friend. The smile you'll be wearing after schooling those mega dollar v-twins will be priceless!
Hang in there friend. The smile you'll be wearing after schooling those mega dollar v-twins will be priceless!
PATMAX: I can school most all those Harley Riders (Also Known as Pirate Look a Likes) with my Sportster. Why would I want to turn the crank on a VMax for such light work....:rofl_200:
I have my "Money Pit" in this 89. it's gonna be pretty nice when I get it done. It'll be my Hot Rod.. I'll save Strafer for better things...
Aren't you building an 85?????:biglaugh:
Added 12/18/10: I cleaned the bike a little today and put black door edge molding on the front and rear fenders. Stuck the Flaming Skulls on the side covers and got them mounted too. Nice..... Tried to resync the carbs but still some crap in the system. It'll eventually clear up with the cleaner I'm running just like Strafer did... I'm going to do a fuel filter tomorrow just because.
Added 12/20/2010: I went out and searched for a fuel filter. Nothing good came of that so I'll buy one from Yamaha tomorrow. I took the filter off and it was packed with surprises from Ethanol. The picture shows a small amount of what was actually there. I had tossed the filter and then decided to take a picture and retrieved it. I pulled the handlebar normal / reserve switch apart, cleaned the contact and verified that it was good. I followed the directions to a link I found about the fuel pump. http://www.vmaxforum.net/showthread.php?t=8775&highlight=fuel+pump+clicking Disassembled and checked it all over. You'll want to mark the parts like I did, as they come apart so it'll go back together and be orientated right when the pump goes back on the bike. I cleaned the contacts while I had it apart. Found that the Fuel Pump Relay's bad too (Under the left scoop, front module). Tomorrow I'll stop by Kyle's for the relay out of the 90.
Added 12/21/2010: I picked up a fuel relay at CaptainKyle's this morning and a Real Fuel Filter at the dealer. I didn't think Kyle would be stocking fuel filters.. Wrong. When I got home, I installed the filter and the relay. The relay didn't help my condition and the hose I bought for the filter to the fuel pump was so stiff (USCG B-15 Ethanol Proof) I had to double clamp to get the leaks stopped...I charged the battery and ran the bike. It started and ran good until I tried a 4th and 5th gear roll on. It still breaks up at about 4,000 rpm. If I back off the throttle just a touch it will keep picking up speed without breaking up. Stage 1 with the needles dropped all the way and it's still running rich... Could be the drilled slides. I may have to JB Weld and re drill...
Added 12/28/2010: I've ended up fighting a battle against this bike for every inch I've gained. I've spent the past few days cleaning up all of the work I've done, finalizing all the little projects. It's still got an oil leak that I never could get rid of. It drips onto the sidestand and down to the floor. Eventually I'll find where it's coming from. I was really particular, nit picky when replacing the stator cover and pan gaskets too. It's driving me nuts.....:bang head:
I decided to go after the overly rich conditions of the DJ Stage 1, as it sets. Since I don't have any jets or needles to swap in right now, I had to come up with an alternative. The plugs were running dark enough that I went one heat range hotter on them. The carbs all seemed to have cleared up with the cleaner I've been running and are all working with each other. My mercury manometer is as old as the hills. Impossible to clean the tubes. So when I use it I have to swap the tubes / hoses that are closest to reading the same from cylinder to cylinder and side to side. I ended up rechecking myself 4 or 5 times over today.
When I took it out for a ride, I was shocked and left in Awe. It's a smooth as glass and holds a steady speed without any fuss at all. I grabbed a hand full of 2nd gear on one of the less traveled roads and had to throw all my weight forward to keep the wheelie under control.. It's a good thing I didn't try that in first. This things purrin like a kitten (Of The Cheetah Variety)..
This bike's been one problem after another. Honest, I don't know if I want to keep it yet. It's been a RPIMA since day 1. I never thought about naming any of the previous 34 bikes I've owned. Strafer just kinda happened for the 94.
I had such a great ride this afternoon that I went out again tonight. It's colder than crap for us right now, under 50 and pretty damp. It was a cold ride and I was thinking of what I might call this bike. It's got skull artwork on the front and rear fenders, faus cover, stainless steel flaming skulls on the side covers and I wear an Icon Skull Helmet when I ride it. I got to thinking about having to dress like a Pirate and ride the Harley tomorrow night. :ummm: SkullDuggery popped into my head.. I looked it up On-Line and it says:
Definition of SKULLDUGGERY
: underhanded or unscrupulous behavior; also : a devious device or trick
Since I brought this bike home, it's let me fix one thing only to find 2 more problems that needed fixing. I call that underhanded and unscrupulous. The bike itself is devious and it tricks me into thinking all's well only to find more problems the next day. I don't particularly think there's anything nice about the name but it sure fits this bike...
BTW, the ride was great, the bike ran perfect and it's still pissing oil on my garage floor. The gas mileage sucks too. Atleast I know what to call it now....:biglaugh:
This Bike and I have a Typical Love vs Hate Relationship..... I Will Win...
Added 1/3/2011: I'm changing some of the parts around between my 94 and this 89. I'm upgrading the parts on the 94 and moved those parts to this bike because they are in better shape. I exchanged out the parts from the 89 that I could so CaptainKyle can get them blasted, powder coated and back in the mix for future exchanges. New powder coated parts to the 94, Factory Sissy Bar with Pad and Diaphragm Covers, a new to me SportMax Seat that I got from CaptainKyle. Old Sissy Bar and Diaphragm covers moved from the 94 to the 89.
My old Mercury Manometer doesn't work very well. It needs to be cleaned and have clean Mercury added. I bought a Motion Pro Sync Tool, got 10% off and it's adjustable to maintain calibration.
Added 1/6/2011: Long story made short, I had a problem where the fuel pump would not run with the switch to on. It had to be in the reserve position. I had 2 dashes, an 89 and a 90. I swapped the 90 dash in and later found that the wiring harness is different between those 2 years. The dashes will work if the wiring harness is moved over. I went nuts trying to fix the problem. I swapped the 89 dash back in when I found that it was different and eventually found the lamp socket for the fuel light was bad, not making contact with the bulb. I fixed it and now everything is like it should be. On means on, the light comes on for low fuel and reserve is reserve. Added: Well, it did until the next day. The fuel pump's running for 5 seconds everytime the ignition is turned on. Checked everything for leaks nothing, swap to my spare relay. now it works fine again... Bad Relay...
Added 1/9/2011: Over the past few days, I swapped out the Stage 1 main jets and needles, going back to a stock set.
If I'd known there were 155's in for mains, I would have skipped that step. I shimmed the stock needles 0.032 and swapped back to the standard heat range plugs.. The bike runs cleaner now. A riding bro and I set up my Motion Pro and went after a better sync on the carbs. We went back and forth and things seemed to change right as we had everything right on the money. We did the final sync at 3,000 rpm. I went to start the bike last night so I could show the bike off with all the parts. This bike is Damned. It started fine but it was pissing gas from right in the middle of the carb block. I ran back in for a flashlight and decided I needed to pull the cover and air box. I looked at all the hoses and saw nothing. I'd used double clamps at all junctions because of the type of fuel line I put in. It's tough stuff... I turned out to be the front right carb. It was pissing out the tiny tiny opening at the top of the carb, not the air jet but the one beside it...I used a plastic handle and pounded on the top of the carb with the engine running. I reved the bike to about 3,000 rpm a couple times and it stopped. I let the bike run for a few more minutes with fans on it and then left for Earl's to show him the bike all dressed. The whole way there I was thinking it was gonna start again and French Fry me, but it didn't... On the way back, I hit it hard in second and carried it on to redline in 4th. No more stutter, even in a 5th gear roll on. I can't wait till my next trip to the garage to see what this bike screwed up since the last time I worked on it... It's Possessed....
Added 1/11/2011: Removed all the R&R wire plugs (Lame Connections) , soldered the wires and used heat shrink. Charged the battery and actually got a ride in with no Crap from the bike.... Amazing....:biglaugh: Someday, this bike'll quit fighting back....
Attachments


Last edited:
My God, Dave I have to tell you, you definitely have patience and perseverance!
Seeing it in person and reading about all the work gives me a new appreciation for it.
"Good job" doesn't cut it! Whenever you need a hand, let me know!
Seeing it in person and reading about all the work gives me a new appreciation for it.
"Good job" doesn't cut it! Whenever you need a hand, let me know!
PATMAX
Well-Known Member
First off, coneao1 first post.! What took so long. Don't be a stranger.
Dave, I am proud you are whipping Skull duggery into submission. Some bikes need the discipline. Wouldn't It be a damn shame that you go through her so thoroughly and sell her right when you got her all sorted out and someone else gets to enjoy years of carefree service from her.
In one of your old posts, you asked about my 85. Actually got two but one is farther along than the other. My issue is money and motivation. I just have been feeling like shit for so long, I just can't bring myself to spend a half hour out in the shop/garage. Hope I'm not clinically depressed or anything like that. Reading your trials and tribulations make me feel better though because it's you and not me! LOL I'll get up to see you and Capt'n soon enough. Thanks for the entertainment
Your brother, Patmax
if you need anything give me a shout out
Some Pictures appear way at the bottom because this is such a long post....
CONEA01: Bro, you have anything we can do atleast VGA Video with??? I want to run the 89 and 94 past a camera so I can post on YouTube to see how the 2 types of exhausts sound from off the bike....
PATMAX: i'd give you a boost start if you didn't live a hundred miles away.:biglaugh: Sorry you aren't feeling better,
I'll have SkullDuggery done soon and be looking for projects. I'm probably gonna buy a Lathe and Bead Blast Cabinet to start making some of the stuff for the weapons I'm testing... I'll still have time on my hands. Hell, I might buy a gun and some accessories for my compressor and start painting again. It's been a long time...
I'm going to use Strafer for trips with my Wife when we have my Mom in Assisted living 3 days a month. SkullDuggery's probably gonna be my Hot Rod once I'm a little farther along and sure all the parts are up to it. Wife wants me to buy a gen 2 and sell all the others. 2 out of 3 run perfect so I just can't see doing that...
I sure have had some adventures getting this 89 to where it is. I hope to use some of my experiences to make some "How To's and Not How To's":rofl_200:Maybe someone will read this thread someday and continue on their VMax because they can feel my struggle and know they have had company.
Damn, someday maybe the Mod Monkey'll get his Cuz offa my Butt and give me a nicer, smaller Monkey.
Added 1/20/2011: I went through last night and troubleshot my 89's left front carb. The plug was looking a little strange. The top 1/16" of the insulator was white and the rest was black. All of the other plugs are rich, Eventually I'll change the main jets. I'm kinda taking a break and getting some riding in while Florida actually has some sun showing and may get into the low 70's.
I had installed what I thought was a better diaphragm in that carb because the one that was in there when I bought it was tightened down while part of it was out of the groove. Turns out the one I installed had a small crack or cut in it. Looks huge with the light shining through it but not really visible without the light. It pays to check your diaphragms with a flashlight before re-assembly. The one that originally came out has been sitting in a cup on a shelf and shrunk. It didn't have any holes in it, just creases. I sprayed it with WD then dried off the edge and the bell of the carb. I used blue painters tape to hold the diaphragm in the slot on all 4 sides. I pushed the cover against the tape, then pulled each side of the tape out one by one, installed the screws and all was good.
I synced the carbs and had it out for a ride today, Still rich even with DPR7EA-9's in but it runs good.. I'm not sure what the A/R Ratio is but I would guess 11 or 12 to 1 ???
I still have to fix the oil leaking at the stator wires. change the main jets to some that are smaller and switch back to DPR8EA-9 plugs.. The bike only knows what else it'll need then.. That seems to change daily...
Added 2/5/2011: I've been riding the bike even though the jetting had been a bit rich. Rode it to Kyle's last Thursday to pick up the new jets. Didn't get time and energy coordinated to work on the bike until today.
Swapped cables on 2 of the dashes that I've got. One was for 90 VMax and newer. The one that's been on My 89 was intermittant. The Tach and Temp Gauges sometimes didn't come on after cold start up. I've had to smack the crap out of the dash at times in order to get my gauges to work. As Sean had mentioned the dashes are the same but the wiring harnesses are different.
I also pulled the carbs off and drained the bowls. Changed the main jets from 152.5 to 147.5. Changed the NGK, DRP7EA-9 Plugs back to standard DPR8EA-9's. Looks like a resync is going to be next. The 1 and 2 carbs seem to be out of whack..
Added 2/21/2011: I've been locked in a seemingly endless battle with the Evil Spirit of my 89 VMax. PATMAX, allisontech, CaptainKyle, Conea01 and a few of the Ladies were present when we cut SkullDuggery's Evil Heart Out... Air Correctors,,,,, I've been asking about them for some time. Actually, I didn't know what they were but I knew they just didn't look right being in 3 carbs. Something was wrong with that picture.
CaptainKyle had a revelation just when we were getting down to business. Out of the blue, he said; "Air Correctors. I bet that's what you asked me a question about way back".. Sure enough, 3 of them.. We all scrounged around trying to figure out a way to get them out. We took the tip off of a tap but it didn't get the job done. We finally found the perfect screw. Allisontech assisted with a pair of diagonals. I turned the screw in and using a piece of metal for leverage, he pried them out with the cutters grabbing the screw threads.
Picture of the last Corrector removed and still on the screw is below. Somehow, the screw and last corrector got carried home in the fuel filler neck tray of my bike. Guess it just couldn't give it up. Kyle,,, I have the tool that you need to hang on to forever....
PATMAX had brought his CARBTUNE so Earl (Conea01) and I sync'd the carbs.
I test rode the bike and it ran but just didn't feel right... When I got back, I convinced CaptainKyle that Flip Flops weren't appropriate riding attire. He put some tennis shoes on, told me to get over his wearing shorts and took the bike out. That sparked a debate that my VBoost wasn't kicking in but the bike ran alright... I swapped 2 plugs but didn't really want to waste new plugs until I could do some meaningful readings.. I thought the one plug was just dark and would clear up in another cylinder.. NOT... The bike ran ok, if it were an old XS-11 but it was a slug for a VMax...
This morning, I pulled the plugs, 3 were very nice, tan. The one plug was still black. I thought for sure it would be cleared up. It was fouled all day long when we were working on the bike.. New plugs went back in after I checked the gap and put some Never Seize on the threads...
Rather than waste a ride, I re-sync'd the carbs at 3,000 RPM. Took the bike out the back way, did a rolling start from about 5 mph in first gear. Holy Crap, Big Balls.. Jacked the rear end up, Pulled the front wheel a little off the ground and squawked the rear tire pretty good too... That's What I'm Talkin About... This Max is back, in this once derelict, ready for the boneyard 89..... :clapping::clapping::clapping:
Added 2/27/2011: True to form on this bike, things change daily, Thought I'd finally beat this bike's evil nature. I had her running pretty good atleast I thought so. Ran like a Bat Outta Hell, no sign of a miss. I pulled the plugs and, the left side looked pretty good, nice tan. Pulled the right side and they were nearly black.
Ran the bike and sprayed the shit out of the carb joints, looking for a leak even though I didn't believe that to be the case. I had 147.5 Main Jets in
and believe the leaner condition of the left side to be a good representation of what the plugs should look like. I checked the right carbs for a stuck float or something else stupid that may have been overlooked.
I pulled the carbs off and checked the rubber for cracks that extended into the inside. None existed. I checked the VBoost timing and travel, Nothing out of the ordinary.
I bought a set of nice carbs to have as spares. Broke them down, and went through everything. Float level and jet blocks off for cleaning. There wasn't even dust inside the float chamber. They looked new. I pulled the diaphragms and cleaned and lubed everything. Pulled the 147.5's and installed them into these carbs. Just for grins, I filled the carbs to overflow with WD-40 and left them sit over night.
Dumped the WD yesterday morning and installed the carbs. Checked all the plug wires, coil connections, everything I could access. Found nothing.
Checked the calibration of my gauges at Idle and set the bike up at 1050 RPM. She idled like a new bike. Brought her up to 3,000 and the sync went to hell. Set the gauges up for cal at 3,000 rpm. Synced the carbs there. Took her for a ride and she was a little rough below 3k but almost threw me off the back in low gear acceleration.
When I got back from my ride, I cut the ignition at 3,000 RPM and coasted to the driveway. When I pulled the plugs, same shit as before, these plugs looked alright on the left side and dark on the right.
Added 3/2/2011: And again,,,,,.
I've spent the past few days, checking coils, plugs, ignition module, diode pack, re-reinspecting the newer set of carbs that I picked up. Found that most everything was good. Pulled the carbs apart and went over everything. Found 1 float intermittently sticking. 3 missing O-Rings on the A/F Screws. One missing a washer/shim. Did a Shotgun Cleaning on the carbs. Re-Sync'd them at 3,000 rpm.
I didn't get to take a ride until tonight, I think it's the best SkullDuggery's run since I started work 4 months ago. When I got home, the Spark Plugs were actually the same color....Amazing......:rofl_200:
I ran a compression test with the gauge I borrowed earlier in the day from CaptainKyle. I met him at the powder coater and picked up some 150 main jets, just in case and a Middle Gear Cover Gasket so I can attack the oil leak around the stator wires again... Anyway, the compression test came out good IMO. Cylinder 1 = 159,,, 2 = 160,,, 3 = 152,,, 4 = 156.
More success in a never ending battle, fighting an Evil Spirited Bike...:clapping:

Added 3/3/2011: The plugs in my 89 are now running the same color, but very little color on the insulator.. Just a tinge of Tan on the Insulator after 18 miles, How lean is too lean???
I set the sync at 3,000 rpm and it's apparently right on as I shut the bike down from 3,000 rpm and coast into the driveway. Outer ring is black but not to an excess. Tip is tan.
A/F Screws, I believe I know the answer to this but want to confirm. Farther in, Richer? Farther out Leaner? I'm currently at 2-1/2 turns out.
If I free up the intake to breath better, It Leans the total mixture?
If I free up the exhaust to breath better, it Richens the total mixture?
Kerker with 2" core, K&N, 147.5 Mains. Stock needles shimmed 0.034, all other jets stock, AF Screws as mentioned 2-1/2 turns out....
I made a new core, 2-1/4", this richened the mixture a tiny bit but made the plugs more acceptable to me. Slightly Tanner.....
Added 3/10/2011: If i were to let the bike set for any length of time, I'd expect the fuel level to drop in the carbs and the fuel pump would run for 5 seconds at "Key On". Then, I'd expect the pump to run at start up until the carbs filled up. If I shut the bike off and turned the key right back on, I'd think the carbs would be full and the pump would skip the initial 5 second run. It would only kick on when additional fuel was needed.:bang head::bang head::bang head::bang head::bang head:
There are times that the fuel pump will run for 5 seconds, then I turn the key off and back on, over and over and over the fuel pump runs. Today, I pulled the air box and watched the carbs for overflow while I did this dozens of times, nothing overflowed. I've had the pump apart and everything was in place. There are times that the pump acts just like the one on the 94 and at"Key On" I'll get a click, click. Carbs are full and pressure is up.
Note, this has occurred with 2 different sets of carbs on it, multiple relays, several gauge pods, new lines, new filter and so on..... Even cleaned the tank vent....
This turned out to be something that's common on the older models and occurs when running the engine to adjust the carbs or whenever the bike gets extremely warm for an extended period...
Added 3/20/2011: I have the same ongoing problem with my 89. I replace the stator gasket the first time.
I pulled the stator cover at the last Central Florida Tech Day. CaptainKyle and AllisonTech or maybe PATMAX cleaned the wires and put some RTV around them. Set time was minimal since I had to ride the bike home after we finished..
Today, I pulled the Middle Gear Cover since I was stringing a new clutch hose. It gives easy access to the wires coming out of the stator. I removed all the RTV that I could and cleaned the crap out of the area that the wires are coming through the cover grommet. Used a Tooth Brush, Q-Tips and Electrical Contact Spray Cleaner. I had plans of injecting RTV around the wires and into the grommet. I have a hobby hypodermic. With the RTV to be injected being Super Red. I got a little in that way, then I carefully built up a lot all around the wires, both the top and the bottom grommets and wires. See Pictures. I'm letting it set over night. This should be the end of the irritating leak. I Hope...
For anyone doing it this way, remember the little nylon washer the goes on the bottom center screw of the Middle Gear Cover or you'll have a leak there... The screw is open to the oil in the middle gear...
Added 4/1/2011: I haven't changed the setting on my Dyna 3000 from 1 yet... It runs fine for me... Man, am I getting Old...
Parts to rebuild the Clutch Master Cylinder on the 89 came in Wednesday. I picked them up from Kyle Wednesday Night. The Clutch stopped working after a ride around Tampa Bay 2 weeks ago. Actually it died, clutch wouldn't disengage when I got off the interstate but I managed to get home with a little fiddling..
I had an oil leak from the Stator Wires so I ran a fix on that while things were opened up. I had the Middle Gear cover off... I cleaned around all the stator wires with Non CFC Brake Cleaner.. I injected some red RTV around each of the wires and then packed more around each group and it's grommet. Should never leak again...:rofl_200:
Since I've never done one of these master cylinders on a VMax, I went slow. I found a picture here that had all the parts laid out in order, stolen from another's post.... (Last Picture) During disassembly I found that none of my snap ring pliers would go far enough in to get to the clip holding the guts in the master cylinder. So, I took a pair of Surgical Forceps and modified them to reach and grab the clip... I left the mirror on the master cylinder so I'd have something to hold it with.. Cleaned all the Brake fluid off everything when I got it all back together.
BTW: My 89 had a POS Clutch Line installed so I swapped it out with a stock line that Kyle had off a 90 he'd stripped...
I don't have a vacuum bleeder. I tried everything to get some resistance from the lever. Finally, turned the bars to make the clutch reservoir the highest point of the bike and worked the lever in and out to various degrees. Little bubbles were coming up from the line and slave cylinder and popping up in the master's reservour... After about a half an hour, I had full pressure built up and no more bubbles. Now my clutch seems to work fine ....
Added 6/4/2011:
Rusty sent some parts he was just getting rid of. It's a Gold Mine for me, someone with way too much time and no life...

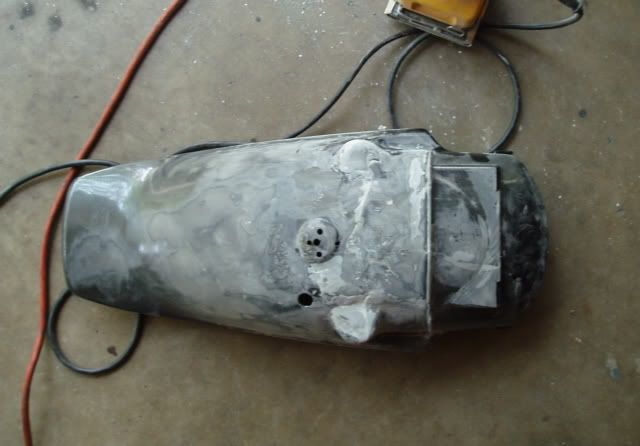
This rear fender was shattered at the front. So badly that I super glued the pieces together before I started any further repair. I debated just forgetting this project but I couldn't resist. Rusty had packed the parts in pieces of new T-Shirts... Guess they're free to him.??? As it turned out, I didn't have any fiberglass cloth so I used a T-Shirt instead. I had some Epoxy for boat repair that's been sitting in my garage for the past 20 years just waiting on this fender...
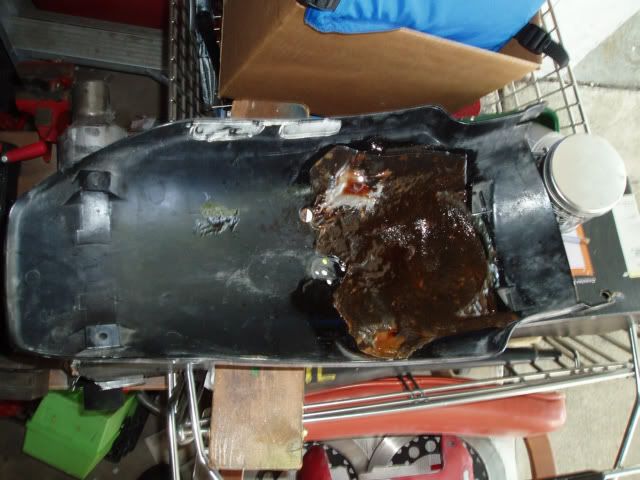
After I had the glass ??? over the inside of the fender, I went to work with mainly JB Weld to build the top side back to a usable shape. Some of the missing parts of the fender were replaced during this process... Actually, as this progressed I found out just how tough my repair was., I dropped the fender pretty hard on the driveway. Not intentionally but it was better than taking the tumble myself.. Don't ask....
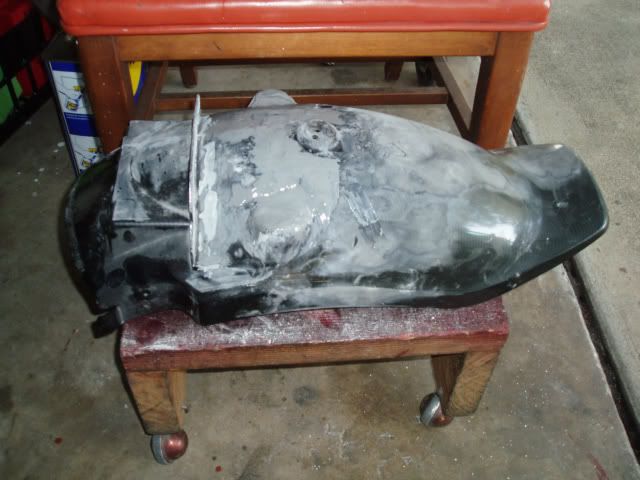
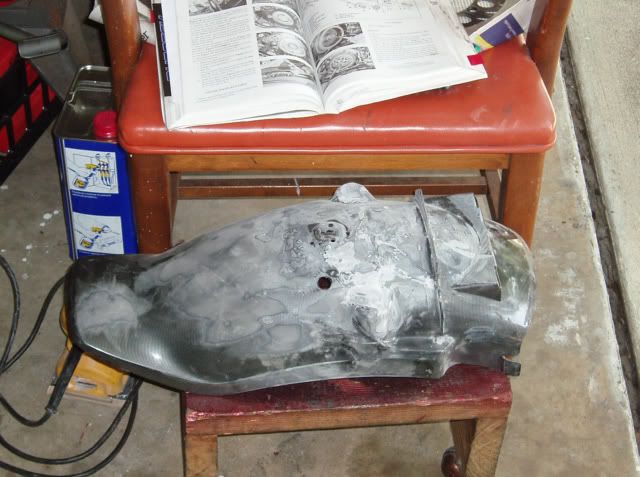

Anyway, the pictures lead you through the rough process that I followed. Eventually laying a Primer / Sealer on and then Retro Red with Iridescent Clear over it all... Not bad for the 40 or so hours I farted around fixing and painting... Saved it from the bone yard and what better place for it to end up than on SkullDuggery...

Thank You Rusty and may the Gods Shine on You...
BTW: The other parts Rusty Sent are in really good shape....
He refused anything in return, What a Great Guy......
I don't have a clue why the last lines are underlined....
 I tried everything including signing out and back in to get rid of it but it just wouldn't go away....

Added 6/5/2011:
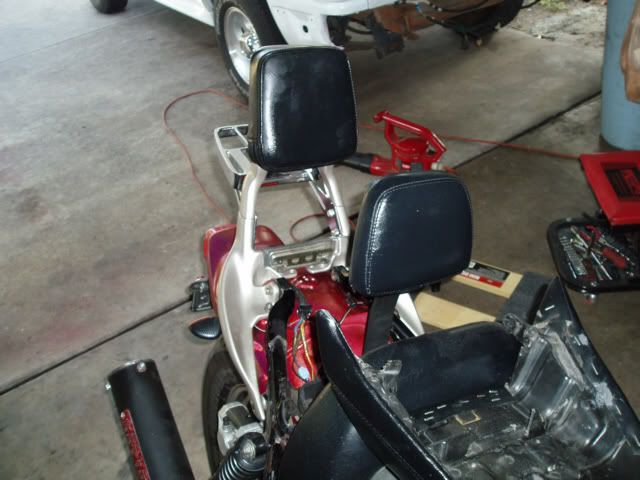
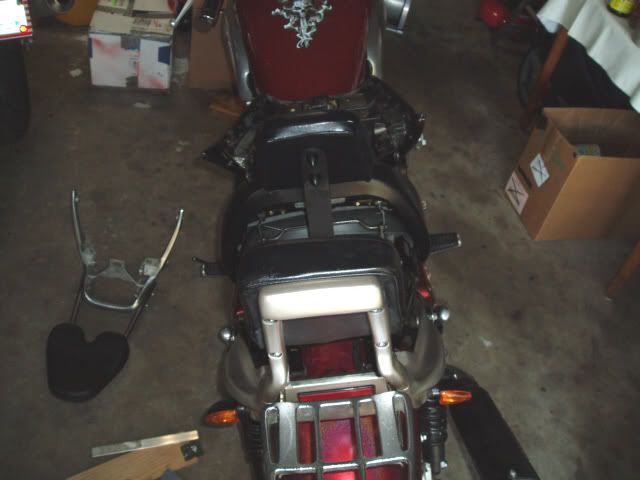
This Sissy Bar and Rack shown complete and on the bike just above. Time's twisted up on me....:bang head::bang head::bang head::rofl_200:
Wheeling and dealing, something I never have much luck at any more . I acquired this sissy bar and rack. This time I came out alright and hope I've made a friend about 4,000 miles away.
Kyle recommended Mar-Hyde Mar-Hyde? Tal-Strip? to remove anything off metal. Stuff works great. 20 minutes and the clear is a runny mess. Damn stuff even got hot through Smurf Gloves... After that, I stripped the minor corrosion off. I didn't figure it needed bead or sand blasted.
There were a couple cracks and 1 broken piece on the one upright. I had them welded up as good as new.
I had a couple cans of Plasti Kote - Dupli Color in a silver that matched a 1973 Mach 1 Mustang. Kind of a goldish silver. Anyway, it looks good and I might do the rest of the silver on the bike to match. I decided against powder coat, cost and time to completion. I believe the Plasti Kote will hold up pretty well. It's a bitch to get off so I hope so...
These sissy bars as far as actual fit are POS's. Why you have to fight with them everytime to get them to align and fit is beyond me. There was a little rust on the rack but not bad enough to have it stripped and powder coated. I had to make the piece that holds onto the rear of a stock seat. Piece of severely bent up Aluminum works great...
I found one of holes in one upright was stripped. May have been the reason for the cracks...
Just re-threaded to a larger screw and installed it... Anyway, here's how it all turned out...

__________________
Added 6/6/2011:
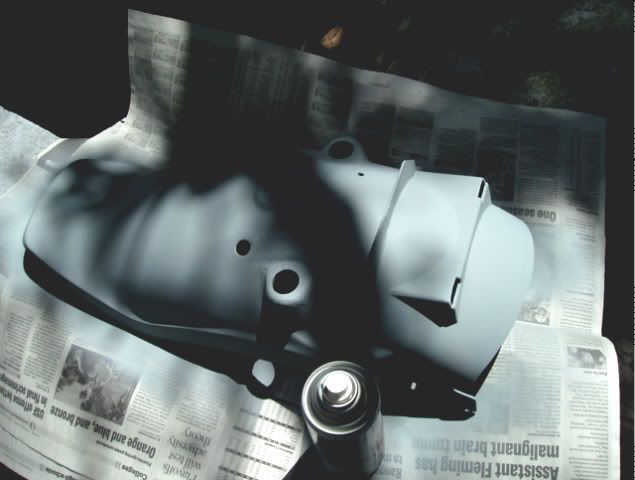
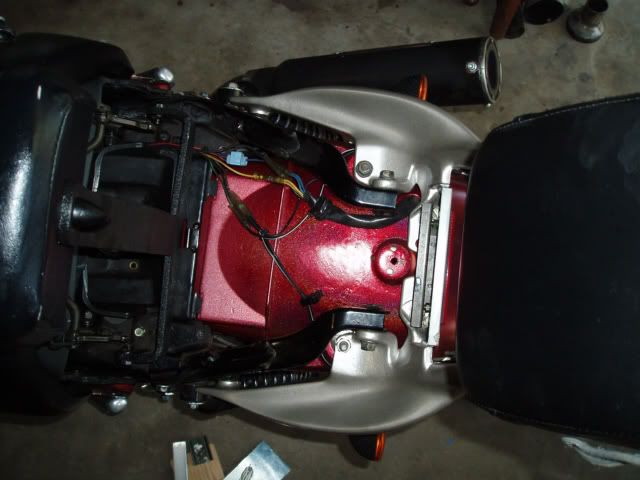
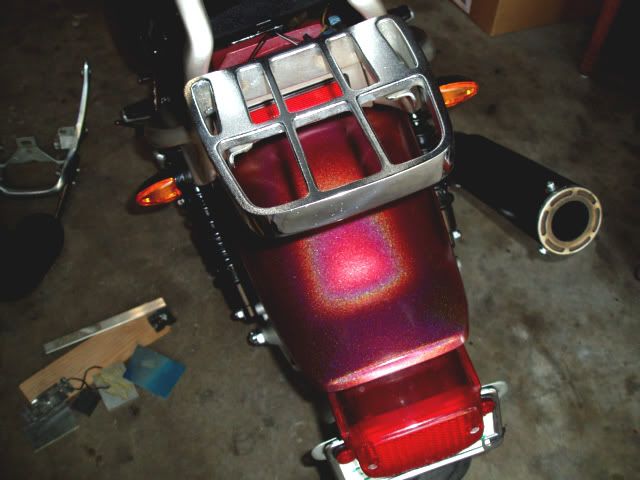
I finally have all the paint work nearing completion on SkullDuggery. Well, the first set anyway. I have to add some detail to what's painted but the first set's the same color now... This top covers the original 89... The color is Retro Red with Iridescent Flake Clear.. So Far...
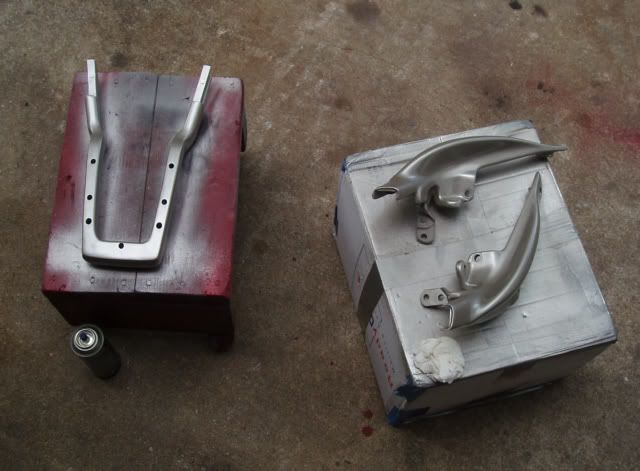
I'm doing another top cover but it's gonna take some time and I didn't want to fell like I had to rush it... I want it to turn out nice.... I'm gonna use a 1990 faus cover for this... I've mounted hood scoops on cars and a few other things but I could really use some thoughts about getting this skull mounted to the cover as neatly and cleanly as possible.. Less rework the better...
I had some Turn Downs that I made up for my 94 but decided to go another direction... They're Experimental and may Wilt under testing conditions. If so, I have another plan for that too. The one I installed was machined out of PVC.. I ran the bike with fans on the radiator for quite a while and it survived. Real test will be a ride today...
BTW, the picture titles pretty well describes what stage things are at...
Attached Thumbnails


Added 6/8/2011:
Finished the first Faus Cover... Pictures below... Bad Lighting at night.
Guess I should start earlier and quit finishing so late..
Attached Thumbnails

Added 6/20/2011:
I've done all kinds of things to make my Kerker Can look and sound better. Painted it black, gave it a color coordinated to the bike exit cap. Built several different cores in different sizes. I just haven't been satisfied.
CaptainKyle had given me a really beat up left side Mark's Can with a 2" outlet. Both Ends were scraped really bad and the middle had rash too. The inlet and outlet were fine. He thought there would be some packing I could use but when I got it apart, there was none there... I found some at a local bike shop. I got to thinking what it would take to rejuvenate the can. I cut an inch off both ends and re drilled for the inlet / outlet caps, now it's 12". Sanded the outer surface with finer and finer sand paper in a 1/4 sheet sander until almost all the rash was gone. What's left gives character...
I made an adapter from the Kerker Pipe to the Mark's Can, leaving as large a diameter as I could and as gradual of a close up as possible. Put this all together with High Temp RTV and wrapped where I needed to fill a gap with Aluminum Foil. Slipped the can over my adapter and used steel rivets to hold the pipe adapter and can solidly in place...
I found 3 pieces of strap, already drilled and made a bracket to hold the can in place. I mounted that to the point on the Kerker where it is mounted to the frames stock muffler mounting point...
I'm a lot happier with the look and sound of the bigger diameter can...Thanx Kyle for the junk can. All the peripheral parts to do this were about $15.00 and it was Fun....
Took the bike out and got some pictures to show here...
My Marx'd Kerker....
Attached Thumbnails

CONEA01: Bro, you have anything we can do atleast VGA Video with??? I want to run the 89 and 94 past a camera so I can post on YouTube to see how the 2 types of exhausts sound from off the bike....
PATMAX: i'd give you a boost start if you didn't live a hundred miles away.:biglaugh: Sorry you aren't feeling better,
I'll have SkullDuggery done soon and be looking for projects. I'm probably gonna buy a Lathe and Bead Blast Cabinet to start making some of the stuff for the weapons I'm testing... I'll still have time on my hands. Hell, I might buy a gun and some accessories for my compressor and start painting again. It's been a long time...
I'm going to use Strafer for trips with my Wife when we have my Mom in Assisted living 3 days a month. SkullDuggery's probably gonna be my Hot Rod once I'm a little farther along and sure all the parts are up to it. Wife wants me to buy a gen 2 and sell all the others. 2 out of 3 run perfect so I just can't see doing that...
I sure have had some adventures getting this 89 to where it is. I hope to use some of my experiences to make some "How To's and Not How To's":rofl_200:Maybe someone will read this thread someday and continue on their VMax because they can feel my struggle and know they have had company.
Damn, someday maybe the Mod Monkey'll get his Cuz offa my Butt and give me a nicer, smaller Monkey.
Added 1/20/2011: I went through last night and troubleshot my 89's left front carb. The plug was looking a little strange. The top 1/16" of the insulator was white and the rest was black. All of the other plugs are rich, Eventually I'll change the main jets. I'm kinda taking a break and getting some riding in while Florida actually has some sun showing and may get into the low 70's.
I had installed what I thought was a better diaphragm in that carb because the one that was in there when I bought it was tightened down while part of it was out of the groove. Turns out the one I installed had a small crack or cut in it. Looks huge with the light shining through it but not really visible without the light. It pays to check your diaphragms with a flashlight before re-assembly. The one that originally came out has been sitting in a cup on a shelf and shrunk. It didn't have any holes in it, just creases. I sprayed it with WD then dried off the edge and the bell of the carb. I used blue painters tape to hold the diaphragm in the slot on all 4 sides. I pushed the cover against the tape, then pulled each side of the tape out one by one, installed the screws and all was good.
I synced the carbs and had it out for a ride today, Still rich even with DPR7EA-9's in but it runs good.. I'm not sure what the A/R Ratio is but I would guess 11 or 12 to 1 ???
I still have to fix the oil leaking at the stator wires. change the main jets to some that are smaller and switch back to DPR8EA-9 plugs.. The bike only knows what else it'll need then.. That seems to change daily...
Added 2/5/2011: I've been riding the bike even though the jetting had been a bit rich. Rode it to Kyle's last Thursday to pick up the new jets. Didn't get time and energy coordinated to work on the bike until today.
Swapped cables on 2 of the dashes that I've got. One was for 90 VMax and newer. The one that's been on My 89 was intermittant. The Tach and Temp Gauges sometimes didn't come on after cold start up. I've had to smack the crap out of the dash at times in order to get my gauges to work. As Sean had mentioned the dashes are the same but the wiring harnesses are different.
I also pulled the carbs off and drained the bowls. Changed the main jets from 152.5 to 147.5. Changed the NGK, DRP7EA-9 Plugs back to standard DPR8EA-9's. Looks like a resync is going to be next. The 1 and 2 carbs seem to be out of whack..
Added 2/21/2011: I've been locked in a seemingly endless battle with the Evil Spirit of my 89 VMax. PATMAX, allisontech, CaptainKyle, Conea01 and a few of the Ladies were present when we cut SkullDuggery's Evil Heart Out... Air Correctors,,,,, I've been asking about them for some time. Actually, I didn't know what they were but I knew they just didn't look right being in 3 carbs. Something was wrong with that picture.
CaptainKyle had a revelation just when we were getting down to business. Out of the blue, he said; "Air Correctors. I bet that's what you asked me a question about way back".. Sure enough, 3 of them.. We all scrounged around trying to figure out a way to get them out. We took the tip off of a tap but it didn't get the job done. We finally found the perfect screw. Allisontech assisted with a pair of diagonals. I turned the screw in and using a piece of metal for leverage, he pried them out with the cutters grabbing the screw threads.
Picture of the last Corrector removed and still on the screw is below. Somehow, the screw and last corrector got carried home in the fuel filler neck tray of my bike. Guess it just couldn't give it up. Kyle,,, I have the tool that you need to hang on to forever....
PATMAX had brought his CARBTUNE so Earl (Conea01) and I sync'd the carbs.
I test rode the bike and it ran but just didn't feel right... When I got back, I convinced CaptainKyle that Flip Flops weren't appropriate riding attire. He put some tennis shoes on, told me to get over his wearing shorts and took the bike out. That sparked a debate that my VBoost wasn't kicking in but the bike ran alright... I swapped 2 plugs but didn't really want to waste new plugs until I could do some meaningful readings.. I thought the one plug was just dark and would clear up in another cylinder.. NOT... The bike ran ok, if it were an old XS-11 but it was a slug for a VMax...
This morning, I pulled the plugs, 3 were very nice, tan. The one plug was still black. I thought for sure it would be cleared up. It was fouled all day long when we were working on the bike.. New plugs went back in after I checked the gap and put some Never Seize on the threads...
Rather than waste a ride, I re-sync'd the carbs at 3,000 RPM. Took the bike out the back way, did a rolling start from about 5 mph in first gear. Holy Crap, Big Balls.. Jacked the rear end up, Pulled the front wheel a little off the ground and squawked the rear tire pretty good too... That's What I'm Talkin About... This Max is back, in this once derelict, ready for the boneyard 89..... :clapping::clapping::clapping:
Added 2/27/2011: True to form on this bike, things change daily, Thought I'd finally beat this bike's evil nature. I had her running pretty good atleast I thought so. Ran like a Bat Outta Hell, no sign of a miss. I pulled the plugs and, the left side looked pretty good, nice tan. Pulled the right side and they were nearly black.
Ran the bike and sprayed the shit out of the carb joints, looking for a leak even though I didn't believe that to be the case. I had 147.5 Main Jets in
and believe the leaner condition of the left side to be a good representation of what the plugs should look like. I checked the right carbs for a stuck float or something else stupid that may have been overlooked.
I pulled the carbs off and checked the rubber for cracks that extended into the inside. None existed. I checked the VBoost timing and travel, Nothing out of the ordinary.
I bought a set of nice carbs to have as spares. Broke them down, and went through everything. Float level and jet blocks off for cleaning. There wasn't even dust inside the float chamber. They looked new. I pulled the diaphragms and cleaned and lubed everything. Pulled the 147.5's and installed them into these carbs. Just for grins, I filled the carbs to overflow with WD-40 and left them sit over night.
Dumped the WD yesterday morning and installed the carbs. Checked all the plug wires, coil connections, everything I could access. Found nothing.
Checked the calibration of my gauges at Idle and set the bike up at 1050 RPM. She idled like a new bike. Brought her up to 3,000 and the sync went to hell. Set the gauges up for cal at 3,000 rpm. Synced the carbs there. Took her for a ride and she was a little rough below 3k but almost threw me off the back in low gear acceleration.
When I got back from my ride, I cut the ignition at 3,000 RPM and coasted to the driveway. When I pulled the plugs, same shit as before, these plugs looked alright on the left side and dark on the right.
Added 3/2/2011: And again,,,,,.
I've spent the past few days, checking coils, plugs, ignition module, diode pack, re-reinspecting the newer set of carbs that I picked up. Found that most everything was good. Pulled the carbs apart and went over everything. Found 1 float intermittently sticking. 3 missing O-Rings on the A/F Screws. One missing a washer/shim. Did a Shotgun Cleaning on the carbs. Re-Sync'd them at 3,000 rpm.
I didn't get to take a ride until tonight, I think it's the best SkullDuggery's run since I started work 4 months ago. When I got home, the Spark Plugs were actually the same color....Amazing......:rofl_200:
I ran a compression test with the gauge I borrowed earlier in the day from CaptainKyle. I met him at the powder coater and picked up some 150 main jets, just in case and a Middle Gear Cover Gasket so I can attack the oil leak around the stator wires again... Anyway, the compression test came out good IMO. Cylinder 1 = 159,,, 2 = 160,,, 3 = 152,,, 4 = 156.
More success in a never ending battle, fighting an Evil Spirited Bike...:clapping:
Added 3/3/2011: The plugs in my 89 are now running the same color, but very little color on the insulator.. Just a tinge of Tan on the Insulator after 18 miles, How lean is too lean???
I set the sync at 3,000 rpm and it's apparently right on as I shut the bike down from 3,000 rpm and coast into the driveway. Outer ring is black but not to an excess. Tip is tan.
A/F Screws, I believe I know the answer to this but want to confirm. Farther in, Richer? Farther out Leaner? I'm currently at 2-1/2 turns out.
If I free up the intake to breath better, It Leans the total mixture?
If I free up the exhaust to breath better, it Richens the total mixture?
Kerker with 2" core, K&N, 147.5 Mains. Stock needles shimmed 0.034, all other jets stock, AF Screws as mentioned 2-1/2 turns out....
I made a new core, 2-1/4", this richened the mixture a tiny bit but made the plugs more acceptable to me. Slightly Tanner.....
Added 3/10/2011: If i were to let the bike set for any length of time, I'd expect the fuel level to drop in the carbs and the fuel pump would run for 5 seconds at "Key On". Then, I'd expect the pump to run at start up until the carbs filled up. If I shut the bike off and turned the key right back on, I'd think the carbs would be full and the pump would skip the initial 5 second run. It would only kick on when additional fuel was needed.:bang head::bang head::bang head::bang head::bang head:
There are times that the fuel pump will run for 5 seconds, then I turn the key off and back on, over and over and over the fuel pump runs. Today, I pulled the air box and watched the carbs for overflow while I did this dozens of times, nothing overflowed. I've had the pump apart and everything was in place. There are times that the pump acts just like the one on the 94 and at"Key On" I'll get a click, click. Carbs are full and pressure is up.
Note, this has occurred with 2 different sets of carbs on it, multiple relays, several gauge pods, new lines, new filter and so on..... Even cleaned the tank vent....
This turned out to be something that's common on the older models and occurs when running the engine to adjust the carbs or whenever the bike gets extremely warm for an extended period...
Added 3/20/2011: I have the same ongoing problem with my 89. I replace the stator gasket the first time.
I pulled the stator cover at the last Central Florida Tech Day. CaptainKyle and AllisonTech or maybe PATMAX cleaned the wires and put some RTV around them. Set time was minimal since I had to ride the bike home after we finished..
Today, I pulled the Middle Gear Cover since I was stringing a new clutch hose. It gives easy access to the wires coming out of the stator. I removed all the RTV that I could and cleaned the crap out of the area that the wires are coming through the cover grommet. Used a Tooth Brush, Q-Tips and Electrical Contact Spray Cleaner. I had plans of injecting RTV around the wires and into the grommet. I have a hobby hypodermic. With the RTV to be injected being Super Red. I got a little in that way, then I carefully built up a lot all around the wires, both the top and the bottom grommets and wires. See Pictures. I'm letting it set over night. This should be the end of the irritating leak. I Hope...
For anyone doing it this way, remember the little nylon washer the goes on the bottom center screw of the Middle Gear Cover or you'll have a leak there... The screw is open to the oil in the middle gear...
Added 4/1/2011: I haven't changed the setting on my Dyna 3000 from 1 yet... It runs fine for me... Man, am I getting Old...
Parts to rebuild the Clutch Master Cylinder on the 89 came in Wednesday. I picked them up from Kyle Wednesday Night. The Clutch stopped working after a ride around Tampa Bay 2 weeks ago. Actually it died, clutch wouldn't disengage when I got off the interstate but I managed to get home with a little fiddling..
I had an oil leak from the Stator Wires so I ran a fix on that while things were opened up. I had the Middle Gear cover off... I cleaned around all the stator wires with Non CFC Brake Cleaner.. I injected some red RTV around each of the wires and then packed more around each group and it's grommet. Should never leak again...:rofl_200:
Since I've never done one of these master cylinders on a VMax, I went slow. I found a picture here that had all the parts laid out in order, stolen from another's post.... (Last Picture) During disassembly I found that none of my snap ring pliers would go far enough in to get to the clip holding the guts in the master cylinder. So, I took a pair of Surgical Forceps and modified them to reach and grab the clip... I left the mirror on the master cylinder so I'd have something to hold it with.. Cleaned all the Brake fluid off everything when I got it all back together.
BTW: My 89 had a POS Clutch Line installed so I swapped it out with a stock line that Kyle had off a 90 he'd stripped...
I don't have a vacuum bleeder. I tried everything to get some resistance from the lever. Finally, turned the bars to make the clutch reservoir the highest point of the bike and worked the lever in and out to various degrees. Little bubbles were coming up from the line and slave cylinder and popping up in the master's reservour... After about a half an hour, I had full pressure built up and no more bubbles. Now my clutch seems to work fine ....
Added 6/4/2011:
Rusty sent some parts he was just getting rid of. It's a Gold Mine for me, someone with way too much time and no life...
This rear fender was shattered at the front. So badly that I super glued the pieces together before I started any further repair. I debated just forgetting this project but I couldn't resist. Rusty had packed the parts in pieces of new T-Shirts... Guess they're free to him.??? As it turned out, I didn't have any fiberglass cloth so I used a T-Shirt instead. I had some Epoxy for boat repair that's been sitting in my garage for the past 20 years just waiting on this fender...
After I had the glass ??? over the inside of the fender, I went to work with mainly JB Weld to build the top side back to a usable shape. Some of the missing parts of the fender were replaced during this process... Actually, as this progressed I found out just how tough my repair was., I dropped the fender pretty hard on the driveway. Not intentionally but it was better than taking the tumble myself.. Don't ask....
Anyway, the pictures lead you through the rough process that I followed. Eventually laying a Primer / Sealer on and then Retro Red with Iridescent Clear over it all... Not bad for the 40 or so hours I farted around fixing and painting... Saved it from the bone yard and what better place for it to end up than on SkullDuggery...
Thank You Rusty and may the Gods Shine on You...
BTW: The other parts Rusty Sent are in really good shape....
He refused anything in return, What a Great Guy......
I don't have a clue why the last lines are underlined....
Added 6/5/2011:
This Sissy Bar and Rack shown complete and on the bike just above. Time's twisted up on me....:bang head::bang head::bang head::rofl_200:
Wheeling and dealing, something I never have much luck at any more . I acquired this sissy bar and rack. This time I came out alright and hope I've made a friend about 4,000 miles away.
Kyle recommended Mar-Hyde Mar-Hyde? Tal-Strip? to remove anything off metal. Stuff works great. 20 minutes and the clear is a runny mess. Damn stuff even got hot through Smurf Gloves... After that, I stripped the minor corrosion off. I didn't figure it needed bead or sand blasted.
There were a couple cracks and 1 broken piece on the one upright. I had them welded up as good as new.
I had a couple cans of Plasti Kote - Dupli Color in a silver that matched a 1973 Mach 1 Mustang. Kind of a goldish silver. Anyway, it looks good and I might do the rest of the silver on the bike to match. I decided against powder coat, cost and time to completion. I believe the Plasti Kote will hold up pretty well. It's a bitch to get off so I hope so...
These sissy bars as far as actual fit are POS's. Why you have to fight with them everytime to get them to align and fit is beyond me. There was a little rust on the rack but not bad enough to have it stripped and powder coated. I had to make the piece that holds onto the rear of a stock seat. Piece of severely bent up Aluminum works great...
I found one of holes in one upright was stripped. May have been the reason for the cracks...
__________________
Added 6/6/2011:
I finally have all the paint work nearing completion on SkullDuggery. Well, the first set anyway. I have to add some detail to what's painted but the first set's the same color now... This top covers the original 89... The color is Retro Red with Iridescent Flake Clear.. So Far...
I'm doing another top cover but it's gonna take some time and I didn't want to fell like I had to rush it... I want it to turn out nice.... I'm gonna use a 1990 faus cover for this... I've mounted hood scoops on cars and a few other things but I could really use some thoughts about getting this skull mounted to the cover as neatly and cleanly as possible.. Less rework the better...
I had some Turn Downs that I made up for my 94 but decided to go another direction... They're Experimental and may Wilt under testing conditions. If so, I have another plan for that too. The one I installed was machined out of PVC.. I ran the bike with fans on the radiator for quite a while and it survived. Real test will be a ride today...
BTW, the picture titles pretty well describes what stage things are at...
Attached Thumbnails
Added 6/8/2011:
Finished the first Faus Cover... Pictures below... Bad Lighting at night.
Guess I should start earlier and quit finishing so late..
Attached Thumbnails
Added 6/20/2011:
I've done all kinds of things to make my Kerker Can look and sound better. Painted it black, gave it a color coordinated to the bike exit cap. Built several different cores in different sizes. I just haven't been satisfied.
CaptainKyle had given me a really beat up left side Mark's Can with a 2" outlet. Both Ends were scraped really bad and the middle had rash too. The inlet and outlet were fine. He thought there would be some packing I could use but when I got it apart, there was none there... I found some at a local bike shop. I got to thinking what it would take to rejuvenate the can. I cut an inch off both ends and re drilled for the inlet / outlet caps, now it's 12". Sanded the outer surface with finer and finer sand paper in a 1/4 sheet sander until almost all the rash was gone. What's left gives character...
I made an adapter from the Kerker Pipe to the Mark's Can, leaving as large a diameter as I could and as gradual of a close up as possible. Put this all together with High Temp RTV and wrapped where I needed to fill a gap with Aluminum Foil. Slipped the can over my adapter and used steel rivets to hold the pipe adapter and can solidly in place...
I found 3 pieces of strap, already drilled and made a bracket to hold the can in place. I mounted that to the point on the Kerker where it is mounted to the frames stock muffler mounting point...
I'm a lot happier with the look and sound of the bigger diameter can...Thanx Kyle for the junk can. All the peripheral parts to do this were about $15.00 and it was Fun....
Took the bike out and got some pictures to show here...
My Marx'd Kerker....
Attached Thumbnails
Attachments
-
 Holy Diaphragm.jpg232.7 KB · Views: 18
 -
 RTV and Hobby Hypo.jpg140.4 KB · Views: 15
 -
 Middle Gear Cover Wire Sealing of stator Wires.jpg331.7 KB · Views: 18
 -
 Ring Clip Removal Tool.jpg137.1 KB · Views: 18
 -
 Master Rebuild Drip Pan.jpg257.6 KB · Views: 16
 -
 clutch%20side%20003 jpg.jpg146.8 KB · Views: 19
Last edited:
Similar threads
- Replies
- 18
- Views
- 2K
- Replies
- 2
- Views
- 5K