


RaWarrior
Well-Known Member
This is a copy from a thread on customfighters.com, written by DrAwKwArD
Thought it was pretty cool and I'd never heard of it here. Not sure if non-members can view the threads, so I've copied it all here.
______________________________________
I know I've done this thread before, but this is a MUCH better write up so I thought I'd share it here too.
Ok guys, I needed to do the rear on the CBR and since I'm a cheap bastard I like to do tire changes myself. This rear took me all of 15 minutes to do not including balancing, which took an extra 5 minutes.
DISMOUNT:
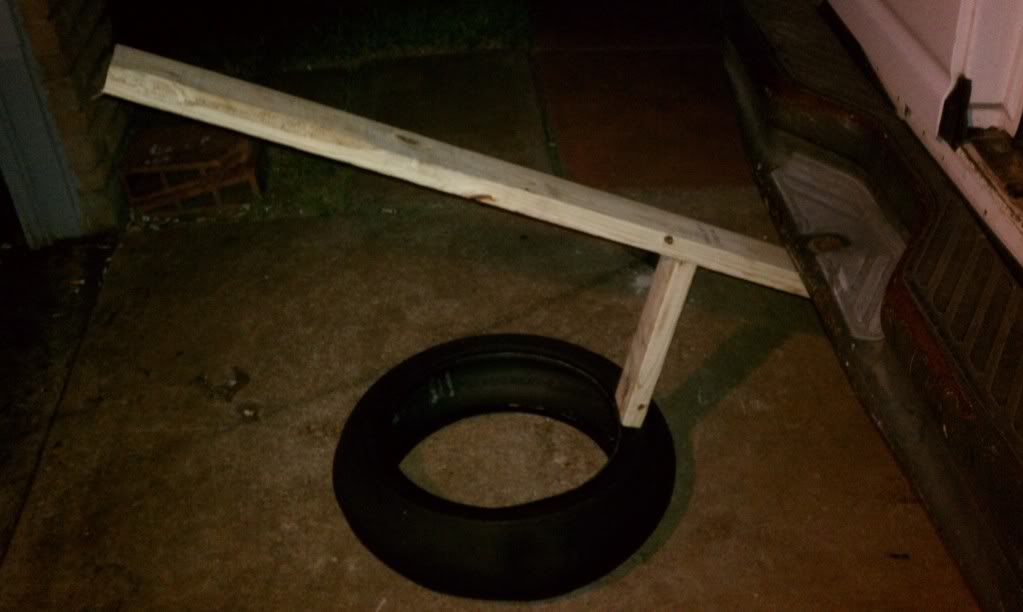
To break the bead all one needs is a long piece of 2x4 and a short piece of 2x4 and a point to lever the long piece off of...I use the bumper of my van as it's far enough off the ground to facilitate this. Step on the opposite side of the wood and push down with a little bit of force...and boom...bead is broken.
<table id="ncode_imageresizer_warning_1" class="ncode_imageresizer_warning" width="640"><tbody><tr><td class="td1" width="20">
</td><td class="td2">
</td></tr></tbody></table>
 <table id="ncode_imageresizer_warning_1" class="ncode_imageresizer_warning2" width="640"><tbody><tr><td class="td2" align="right" width="100%">
</td><td class="td1">Report this image</td></tr></tbody></table>
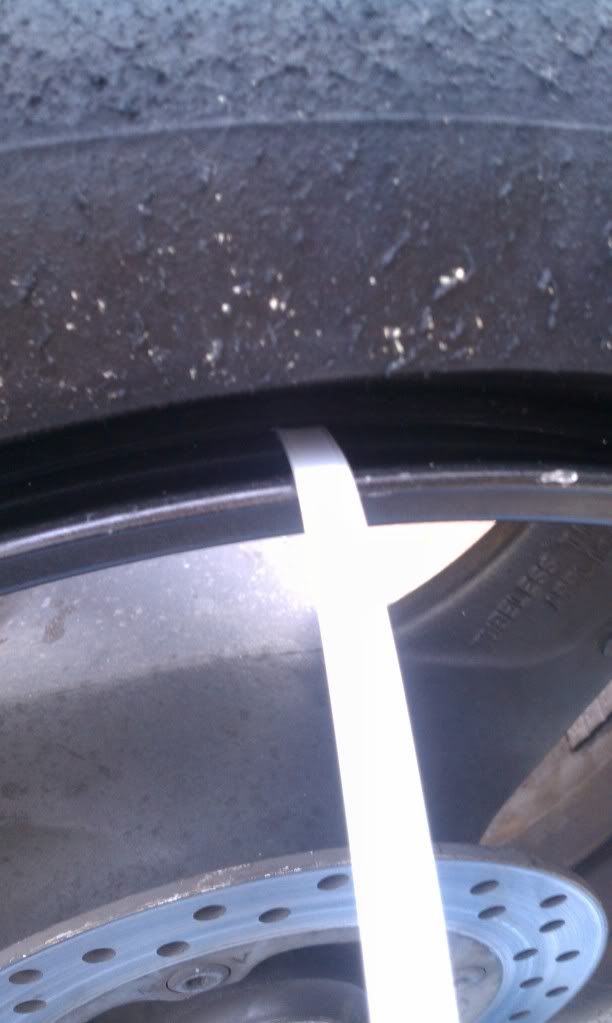
To get the tire off I use these zip ties from Harbor Freight. One pack will do both dismount and mount for only $1.99:
http://www.harborfreight.com/24-inch...ack-66487.html
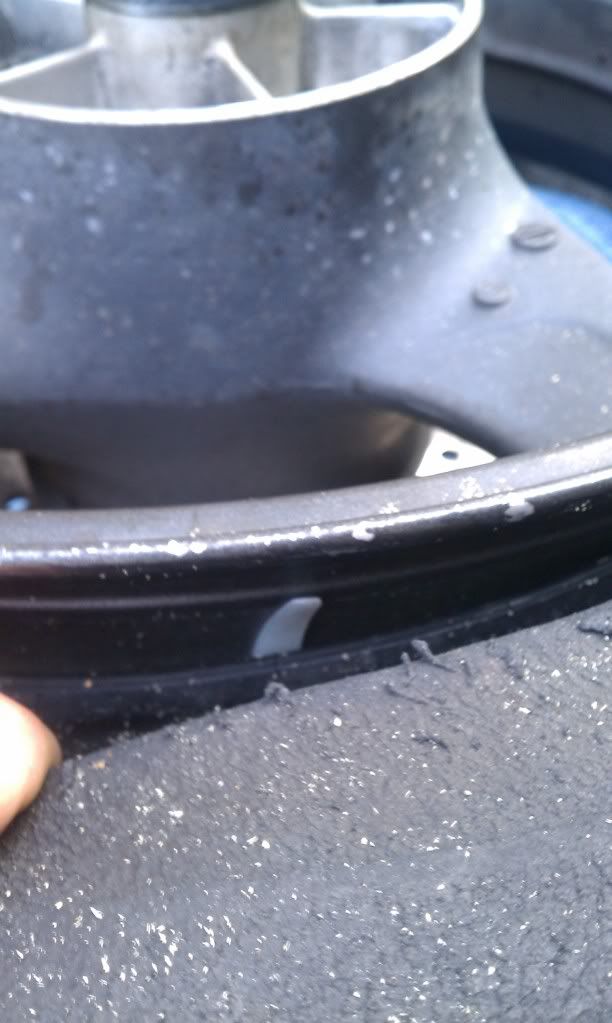
Fish them through the bead like so...once through to the other side ou may need some needle nose pliers to get it out for the first couple, but after that they should all be really easy to fish through.
 <table id="ncode_imageresizer_warning_2" class="ncode_imageresizer_warning2" width="612"><tbody><tr><td class="td2" align="right" width="100%">
</td><td class="td1">
</td></tr></tbody></table>
 <table id="ncode_imageresizer_warning_3" class="ncode_imageresizer_warning2" width="612"><tbody><tr><td class="td2" align="right" width="100%">
</td><td class="td1">
</td></tr></tbody></table>
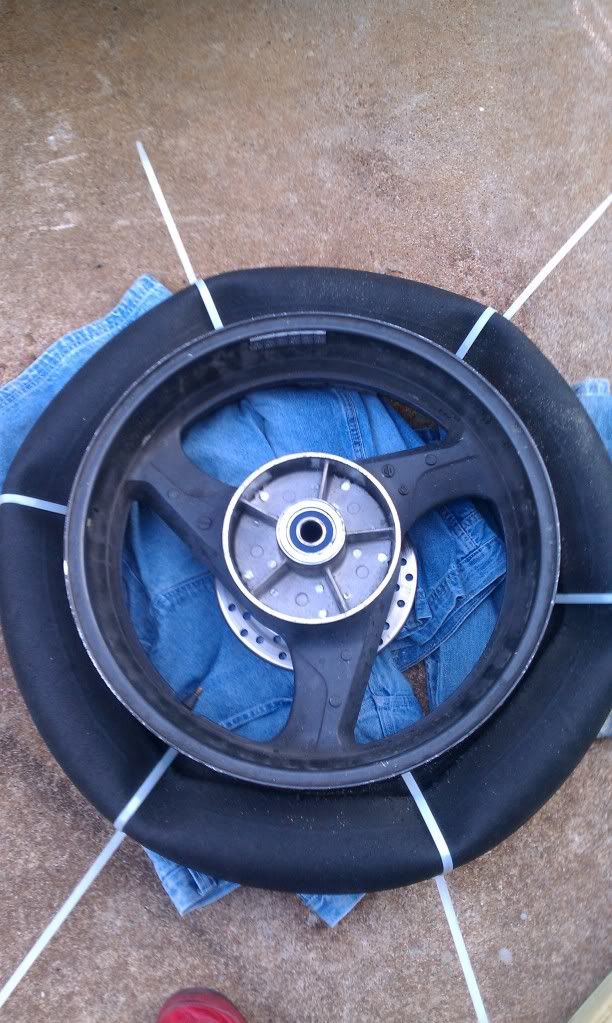
After the zip ties are all in place the tire will look like this:
 <table id="ncode_imageresizer_warning_4" class="ncode_imageresizer_warning2" width="612"><tbody><tr><td class="td2" align="right" width="100%">
</td><td class="td1">
</td></tr></tbody></table>
Just get some ass behind it and the tire will come off...dismount with NO TOOLS REQUIRED. If you don't have the hand/arm strength to pull the tire off like this (because admittedly it was a little tough) a large screw driver or small 5 dollar tire iron will make life a bit easier. But I want to stress how easy and possible it is to do this without tools.
MOUNT:
To mount the tire you basically do the opposite of the dismount...I know that's simplifying it a bit, but it's not much different. Since I used 6 zip ties to get the tire off I wanted to see if I could use only 4 zip ties to put the new tire on so I arranged them in a cross and proceeded to put the tire on. I think it is much easier to do with 5 zip ties because only 4 leaves gaps in certain places where the beads should be touching. And like I say, be liberal with the windex/soapy water because it DOES make a difference in how easy the tire slides on.
EDIT: Total materials cost:
Zip ties - $1.99
2x4 - $1.97
Total - $3.96
__________________________________________
Once the new tire is on, cut the zip ties and pull them out. To re-seat the bead, remove the core from the stem (to allow higher air flow), get your compressor at the highest pressure it can, and blast it, it'll seat the bead with a quick pop, then reinstall the core and air up. People also had success using the "redneck" method of spraying ether or whatever into the tire and lighting it, though that's definitely at your own discretion. If you use dynabeads also for balancing, you can completely skip the dealerships.
Lots of people have tried this and had pretty much universal success. When prying the tire off or on again, it's a good idea to put a couple 2x4s underneath the wheel so you're not torquing on the brake discs. The trick is ensuring the two beads are just touching, and over-tightening the zip ties can make it harder. Using too many zip ties can also make it harder than needed. 3 or 5 seems to be the magic number. Anything from windex to soapy water to KY has been effectively used as a lube. Some tires seem to be tougher/stiffer than others but it's nearly always possible without resorting to a spoon.
Thought it was pretty cool and I'd never heard of it here. Not sure if non-members can view the threads, so I've copied it all here.
______________________________________
I know I've done this thread before, but this is a MUCH better write up so I thought I'd share it here too.
Ok guys, I needed to do the rear on the CBR and since I'm a cheap bastard I like to do tire changes myself. This rear took me all of 15 minutes to do not including balancing, which took an extra 5 minutes.
DISMOUNT:
To break the bead all one needs is a long piece of 2x4 and a short piece of 2x4 and a point to lever the long piece off of...I use the bumper of my van as it's far enough off the ground to facilitate this. Step on the opposite side of the wood and push down with a little bit of force...and boom...bead is broken.
<table id="ncode_imageresizer_warning_1" class="ncode_imageresizer_warning" width="640"><tbody><tr><td class="td1" width="20">
</td><td class="td2">
</td></tr></tbody></table>
</td><td class="td1">Report this image</td></tr></tbody></table>
To get the tire off I use these zip ties from Harbor Freight. One pack will do both dismount and mount for only $1.99:
http://www.harborfreight.com/24-inch...ack-66487.html
Fish them through the bead like so...once through to the other side ou may need some needle nose pliers to get it out for the first couple, but after that they should all be really easy to fish through.
</td><td class="td1">
</td></tr></tbody></table>
</td><td class="td1">
</td></tr></tbody></table>
After the zip ties are all in place the tire will look like this:
</td><td class="td1">
</td></tr></tbody></table>
Just get some ass behind it and the tire will come off...dismount with NO TOOLS REQUIRED. If you don't have the hand/arm strength to pull the tire off like this (because admittedly it was a little tough) a large screw driver or small 5 dollar tire iron will make life a bit easier. But I want to stress how easy and possible it is to do this without tools.
<table class="tborder" style="margin:10px 0" border="0" cellpadding="6" cellspacing="1" width="400"> <thead> <tr> <td class="tcat" colspan="2" style="text-align:center"> How to dismount motorcycle tire with zipties ... </td> </tr> </thead> <tbody> <tr> <td class="panelsurround" align="center">
</td> </tr> </tbody> </table>
</td> </tr> </tbody> </table>
MOUNT:
To mount the tire you basically do the opposite of the dismount...I know that's simplifying it a bit, but it's not much different. Since I used 6 zip ties to get the tire off I wanted to see if I could use only 4 zip ties to put the new tire on so I arranged them in a cross and proceeded to put the tire on. I think it is much easier to do with 5 zip ties because only 4 leaves gaps in certain places where the beads should be touching. And like I say, be liberal with the windex/soapy water because it DOES make a difference in how easy the tire slides on.
<table class="tborder" style="margin:10px 0" border="0" cellpadding="6" cellspacing="1" width="400"> <thead> <tr> <td class="tcat" colspan="2" style="text-align:center"> How to mount motorcycle tire with zipties -... </td> </tr> </thead> <tbody> <tr> <td class="panelsurround" align="center">
</td> </tr> </tbody> </table>
</td> </tr> </tbody> </table>
EDIT: Total materials cost:
Zip ties - $1.99
2x4 - $1.97
Total - $3.96
__________________________________________
Once the new tire is on, cut the zip ties and pull them out. To re-seat the bead, remove the core from the stem (to allow higher air flow), get your compressor at the highest pressure it can, and blast it, it'll seat the bead with a quick pop, then reinstall the core and air up. People also had success using the "redneck" method of spraying ether or whatever into the tire and lighting it, though that's definitely at your own discretion. If you use dynabeads also for balancing, you can completely skip the dealerships.
Lots of people have tried this and had pretty much universal success. When prying the tire off or on again, it's a good idea to put a couple 2x4s underneath the wheel so you're not torquing on the brake discs. The trick is ensuring the two beads are just touching, and over-tightening the zip ties can make it harder. Using too many zip ties can also make it harder than needed. 3 or 5 seems to be the magic number. Anything from windex to soapy water to KY has been effectively used as a lube. Some tires seem to be tougher/stiffer than others but it's nearly always possible without resorting to a spoon.
")